Pages

Showing posts with label Blossom Punch. Show all posts

Friday, 1 November 2013

Chocolate Box


Today I have a box I have made as a small gift, which holds a box of chocolates. It is made with Wild Wasabi cardstock with a band from the old style DSP stack. The flower is made from Whisper White cardstock and the Blossom Punch, sponged around the edges with Wild Wasabi and a sponge dauber. There are several tutorials around showing how to make these flowers and I'm sure all those people are experts at it however, this being the first one I've made, it took me ages and is by no means perfect but I was reasonably happy with it as a first attempt! I finished the box off with a sentiment, from Field Flowers, punched with the Oval Punch and matted onto a Scallop Oval and three DSP loops which sit behind the flower.
Margaret x


Monday, 15 July 2013

Door hanger Treat Box


This is another item we made at our class last week and is a treat box which can be hung on a door. How impressed would your guests be if they found this filled with treats hanging on the their bedroom door?
It is made with Baked Brown Sugar, Chocolate Chip and Pistachio Pudding cardstock. The Pistachio Pudding cardstock was stamped with a butterfly from Papillon Potpourri before being layered onto the box.The hanging part was punched with the largest circle punch and the trim punched from the largest scallop circle punch. To decorate the front a stamp from Mixed Bunch was stamped in Baked Brown Sugar onto Very Vanilla and then punched with the co-ordinating Blossom punch. Another butterfly sits in the middle of the flower and is stamped, again in Baked Brown Sugar, and coloured in with Pistachio Pudding using a blender pen. All finished off with a sentiment from Bring on the Cake.
It looks like it's going to be another scorcher this week and I'm not much looking forward to having to go to work in it - never mind just over a week to go and then it will be the school holidays when I expect it will turn cold or wet again :0)


Friday, 29 March 2013

More 3D


I have a couple of 3D items to show you today (one is unashamedly CASe'd from Vicky - details below) The first one is along the same lines of the decorated Kraft boxes I have posted before but this one uses a white (non SU) box as the base. It is decorated with Pumpkin Pie cardstock and DSP from the Polka Dot Parade pack. For the top of the box I made a flower with the White Creped Filter Paper (available in the Spring Mini), punched with the Blossom punch and sponged with Pumpkin Pie ink then fixed together with a brad (retired). The flower sits on a Large Scallop Circle and I made some paper ribbon loops with the DSP with a tag, stamped with 4U from Tiny Tags and punched with the Jewelry Tag punch. The flowers on the side of the box are made with the Floral Fusion Sizzlits die and Basic Pearls.
Below is the basket which I CASe'd from Vicky (her basket can be seen here). Vicky has a brilliant tutorial on her blog for making this so do pop over and pay her a visit and look at the rest of her lovely projects while you are there! My basket is adapted a bit from Vicky's as I wanted it a bit bigger and I didn't emboss mine as it was too big for the folder!!


Thursday, 21 March 2013

Mixed Bunch Birthday


The other day I showed you a gift box with cards that I had made for a friend so today I thought I would show you the co-ordinating birthday card to go with it. I masked off the left side of a square card blank with a post-it note before stamping a flower from Mixed Bunch in Rich Razzleberry (the ink was stamped off before stamping onto the card to get a lighter shade) and then added some leaves with a stamp from the SAB set, Bloomin' Marvelous, in Certainly Celery. I then added a strip of Sycamore Street (again SAB) before fixing another flower, which had been stamped and punched using the Blossom Punch, with dimensionals. Some Basic Pearls were added for the flower centre and a sentiment from Made for You in Rich Razzleberry.
The Made for You set is a lovely little sentiment set containing 3 stamps - 'especially for you' 'thank you' and happy birthday' in a really nice font and is a bargain at £10.95 for wood mount or £8.95 for clear mount. If you would like to order any of the supplies used (or indeed any others) please do not hesitate to contact me. (Details can be found at the 'Contact me' tab at the top)
Thank you for stopping by today and I'll be back soon x

Friday, 8 March 2013

Spring Box


This box is one I have designed for my next class and, whilst I normally don't post projects beforehand, occasionally there has to be an exception to the rule!!
The base is one of the Kraft Gift Boxes which come in a pack of 4 for just £2.75. Usually I like to make my boxes from scratch but on occasions it's nice to just be able to concentrate on the decorating and these boxes are a good size and very strong. They can, of course, be stamped but for this one I have used Daffodil Delight cardstock along with the Daffodil Delight DSP from the Polka Dot Parade pack to make mats to decorate the sides and top. The flower on the top was made by stamping 2 flowers from the Mixed Bunch set punched out with the Blossom Punch. Once this was done I broke up the fibres in the cardstock by working it quite firmly with a bone folder. By breaking the fibres it allows you to separate the cardstock into two layers, giving you four flower shapes rather than two. A small Pumpkin Pie Scallop circle was placed in the centre of the flower before securing together with an Antique Brad. A large Pumpkin Pie Scallop Circle was glued onto the top of the box and then three loops of Daffodil Delight Taffeta ribbon were attached with sticky strip before glueing the flower in place. The 'sweet treats' sentiment, from Teeny Tiny Wishes, and a retired 'for you' sentiment were punched with the Jewelry Tag punch and fixed onto a petal over the ribbon. The small flowers on the sides of the box were made with the Boho Blossoms punch.
I was really quite pleased with it when I'd finished (a rare occurrence!!!), and the nice, bright Daffodil Delight goes so well with the Kraft. I have a feeling I will be making a few more of these in different colours!

Monday, 1 October 2012

ILWS Blog Hop


Welcome to the ILWS Blog Hop showcasing products from the brand new Autumn/Winter catalogue and the 2012-13 Ideas Book & Catalogue. Scroll down to see what I've been making.


You will have come to me from Laura, at http://lauracreativeideas.blogspot.com/ who's idea it was and who is the first stop on the blog hop.Thanks for organising us all Laura :0)
I won't go into too much detail as you will want to move on to see all the other projects from the lovely demo's taking part.  The first set of things are made with the Ghoulish Googlies Bundle & Howlstooth DSP


The B&W striped Milk Carton above holds a battery nite lite and the picture in the centre shows what it looks like lit up when it's dark! Credit for the ideas of the Notebooks (top right) goes to Vicky Hayes (aka Crafting Clare) and Ange Juda (aka Chic'n'Scratch) for the Two-Fold Treat holder (bottom right). Next thing to show you are projects made with the Autumn Accents Bigz Die


Left & Right are cards made with the die cut leaves/acorns which have been sponged, scored and curled to give dimension and in the centre is a wreath made from die cut leaves and acorns which have been made in the same way. On the wreath I added some Crystal Effects to the acorns to make them a little more 3D. My final projects are showing you the fabulous new 2012-14 In Colours - Raspberry Ripple, Gumball Green, Midnight Muse, Primrose Petals & Summer Starfruit. I used the Mixed Bunch stamp set & matching Blossom Punch along with the Adorning Accents Edgelits Dies and Embossing Folders which were all in the Summer Mini but have thankfully been carried over to the main catalogue.

Right I hope you're not too bored now after this long post and you will carry on happily 'hopping'. Your next stop is Angela over at http://www.sparklycards.blogspot.co.uk/

 Thanks for stopping by and enjoy the rest of your journey :0)
Just in case any of the links aren't working, below is a list of all the demos taking part
 1 - CreativeIdeas_Laura http://laura-creativeideas.blogspot.com
2 - Margaretk21 - http://makingpapercrafts.blogspot.com
3 - Angela www.sparklycards.blogspot.co.uk
4 - Leanie - www.beautifulimpressions.co.uk
5 - Alison - www.craftingalison.blogspot.com
6 - Beckie - www.bextiesandstickytape.blogspot.com
7 - Gill - http://lilybygilly.wordpress.com
8 - Diane - http://craftwithstyle.blogspot.com
9 - Dawn - www.tartanstamper.blogspot.com
10- Zoƫ http://www.stampingscene.blogspot.com
11- Fiona W - http://oakfieldcrafts.blogspot.com
12- Elaina - http://moulinrougestamps.blogspot.co.uk
13- Anne-Marie - http://classycrafters.blogspot.co.uk
14- Sarah - http://esellek.blogspot.co.uk
15- Vronnie - http://vronstampin.blogspot.co.uk
16- Christa - http://serendipity-stamping.blogspot.co.uk
17- RuthE - http://pearsonifiedcrafting.blogspot.co.uk
18- CarolynUK - http://stampaholix.blogspot.co.uk/
19- Amanda - http://thecraftspa.blogspot.com
20- Patricia - http://stampinbeckscraft.blogspot.com
21- Tara - http://ihaventgotacleverblogname.blogspot.co.uk
22- Emma (Citaborca) - http://cocktailofcard.blogspot.co.uk/
23- Emma H - http://www.emma-letsstamp.blogspot.co.uk
24- Sarah Scribbles - http://card-delights.blogspot.com
25- Sarnie - http://www.kraftybiker.blogspot.com/
26- Sharon - http://all-inked-up-sharon.blogspot.co.uk
27- Lynn - http://www.heavenlycrafts.com/stampinheaven/
28- Emma - http://www.emma-daye.blogspot.com
29- Erika - http://twintroublescreations.blogspot.co.uk/
30- Elaine - http://thesassystampers.blogspot.co.uk/
31- Nicky - http://nickyjohncock.blogspot.com
33- Kara - http://karascraftycorner.blogspot.com/
34- Ally - http://www.serendipitypapercuts.blogspot.com
35- Clare (Sparkle) - http://www.sparklecrafts.blogspot.com
36- Julie H (craftybug) - http://www.the-crafty-bug.blogspot.com
37- Jane (browniow) - http://www.janeiowcraftycreations.blogspot.com/


Friday, 21 September 2012

Mixed Bunch Birthday


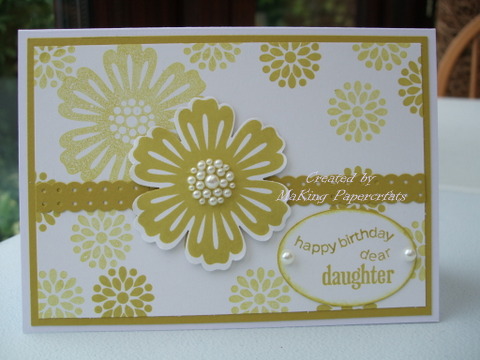
My apologies for being AWOL again! The saga still continues with Dad and, added to that, I've had a streaming cold for 10 days which doesn't seem to want to go - I think I must be looking after it too well :0) Hence not too much crafting getting done at the moment. However it is my sister's birthday today and this is a card I made for my Mum to give to her. I used a couple of the stamps from Mixed Bunch, which was available in the Summer Mini, along with the co-ordinating Blossom Punch both of which, I can tell you, will be making a reappearance in the brand new annual catalogue available from 1st October. I used one of the new In Colours, Summer Starfruit, which was stamped off to get some paler images. The sentiment is part of a stamp in the Happiest Birthday Wishes Hostess set, coloured with a marker and teamed with anotehr stamp from For my Family and punched with the Extra Large Oval Punch. A strip of cardstock punched with the Dotted Scallop Ribbon punch was added across the centre of the card, the central punched flower was added with dimensionals and Basic Pearls finished the card. I also added a bit of stamping to the envelope by using a post-it note as a mask.
Hope to be back soon, have a lovely weekend x

Thursday, 30 August 2012

Treat Basket


This is a little gift basket I made as a peace offering for my 2-year old Grandaughter. Last night my Grandson (aged 4) wanted to come for a 'sleepover' (his word not mine!) with Granny and his sister wasn't very happy that she couldn't come as well. So I had this to give her when I went to pick him up, it goes without saying that she liked the contents (some sweets and grapes) better than the basket but she was swinging it round for a time before her Mummy took it off her and said it could go in her bedroom to keep her hair slides in.
These are the simplest baskets to make, a square of card which can be any measurement that is divisible by 3, score to make 9 equal squares, cut along the two score lines on two opposite sides, then draw up the two sides to meet in a point (glue together where the card touches). Hope that makes sense but honestly it is really easy. The flower on the front was made with the Blossom, 5-Petal Flower and Boho Blossoms punches and fixed in the centre with a Rhinestone Brad. The handle was made with the Dotted Scallop Ribbon Border Punch again fixed with Rhinestone Brads. I added some loops of Pink Pirouette Taffeta Ribbon and a couple of butterflies cut from the Beautiful Wings Embosslits die.
* Update on the blog 'clear out' - there are now a lot of old posts which no longer have the photos but I need to set aside some time to delete them completely. Please bear with me - it's not a quick job!

Related Posts Plugin for WordPress, Blogger...