Pages

Showing posts with label Typeset Alphabet Bigz die. Show all posts

Thursday, 2 January 2014

LIM - Challenge Choice


The theme at LIM (for the past two weeks!) has been to choose a previous challenge and here is my entry - just in time!!
I have chosen Week 146 - 'Use DSP in a CAS way' but it also fits in with Week 55 - 'Punches or Diecuts' and Week 10 - 'Sentiment Only' and maybe even more - who knows???
I have used Primrose Petals DSP cut with the Typeset Alphabet Bigz dies for the word 'happy' and the 'birthday' is a stamp from Memorable Moments. The bunting in the corner is a sneak peak of an up and coming stamp set and co-ordinating punch. A few Basic Rhinestones gave it the finishing touch.
Now it's not very often that I am pleased with things that I make but, I have to say, I did quite like this result so - as I have 4 birthday cards to make this month and none of the recipients know each other - I decided to make 3 more!!


 Baked Brown Sugar (with Basic Pearls)


                                            Basic Black


and Perfect Plum!

             Which one do you like best??


Thanks for stopping by and I'll be back soon
Margaret x

Last of Christmas 2013!

I have some more things to show you today that were made for Christmas, however, as nobody wants Christmas to drag on forever, I am showing you a few things together today!! I will start off with a basket of goodies I put together as a thank you to my lovely sister for entertaining us all on Christmas day


I used some of the treat boxes to hold some alcoholic and sweet treats along with Burlap Ribbon and Crumb Cake cardstock and it was all held in place with some of the lovely brown paper packaging we demos get in our delivery boxes each month!!
Next up are some plastic milk bottles which I came across in a local shop and just had to buy to fill and decorate!


I used a stamp from Festive Flurry along with Silver Metallic Encore Ink to make the lid insert which was cut with a Circles Framelit.
The bottles were filled with sweets to the liking of each family member then tied with Cherry Cobbler 1" Grosgrain Ribbon. The initials were cut from Brushed Silver cardstock using the Typeset Alphabet Bigz dies, tied around and finished with a Basic Rhinestone


Below are little holders made with the Envelope Punch Board and held money for the little people and a Lottery scratchcard for the grown-ups - unfortunately nobody won!!!

Last but not least is one of the gorgeous table gifts my sister made for each of us - sadly I only got round to taking a photo of mine but they were all different sizes to accommodate each guests favourite treats. And of course they matched the rest of the table decorations and crackers!


Now the Christmas crafting has come to an end I may be able to make some 'normal' things so, hopefully, I will be back soon
Margaret x

Monday, 30 December 2013

Happy New Year


Well Christmas is over for another year and I hope you all had a good one. This is a New Year card I made after taking inspiration from the very talented Jenni Pauli (her cards can be seen here). I love her style of cards and I get so many ideas from visiting her blog.
This is made using Crumb Cake cardstock for both the blank and the mat along with a little Very Vanilla. The numbers are cut using the Typeset Alphabet Bigz Die and the 'happy' is from Bring on the Cake. The card is finished off with a few Basic Pearls scattered around. This card is now winging it's way to a very lovely lady so I hope she doesn't peek on here before it arrives!!
All that remains if for me to wish you all a very Happy and Prosperous New Year and I'll be back soon
Margaret x


Monday, 9 September 2013

Card Swap Group September Card


Good Monday morning to you. Today I have the card I've made for this month's card swap and it is for Michelle. (I know I'm safe to show you because I had the loveliest thank you email from Michelle yesterday!)
Jane set us the challenge to make a card using wording as the focal point, so this is what I made. Firstly I cut the word 'hello' using the Typeset Alphabet Bigz dies and fixed these to a piece of Whisper White cardstock using repositionable snail. I stamped images from Summer Silhouettes and Fabulous Florets using Raspberry Ripple and Pear Pizzazz. After stamping I removed the lettering, added Pinflair glue on the back then carefully repositioned them making sure they were in exactly the right place - I needed to add a few touches with my marker pens around the letters where there were small gaps in the ink. This was matted onto Raspberry Ripple cardstock then onto a white DL card blank with a butterfly from Papillon Potpourri finishing the card.
Normally I would use dimensionals but the SU ones are a little too large for the diecut letters hence the Pinflair glue!!
I can't believe we are now in the seventh month of the card swap group and I still find it strange that, although I have never met most of the members, I do feel that I have made some new friends. Michelle, this month's recipient, does a very similar job to me so we have been comparing notes on the 'back to school' events this week (not all good might I add!!).
Thanks for stopping by today and I'll be back soon
Margaret x


Tuesday, 3 September 2013

Birthday Girl


It is my eldest Grandaughter's birthday next week but, as they have now moved back to Suffolk, we had a family get together to celebrate both hers and her brother's birthday before they went and this is the card I made for her. She will be 5 (going on 15!) and loves all things pink and sparkly so was absolutely thrilled with this as she can hang it up in her new bedroom!
There is a name for these type of cards but can't for the life of me think what it is at the moment. Anyway it's made with the Circles Collection and Dress-Up Framelits, Itty Bitty punch and the Typeset Alphabet Bigz die.
Back tomorrow with a matching money holder.
Margaret x

Monday, 22 July 2013

Large Size Leaving Card


I can now show you the second 'large' card I was asked to make for a friend and work colleague who is leaving. The card blank was made from an A3 sheet of white card, folded to give an A4 card. I used Cherry Cobbler (a firm favourite of mine!) and stamped the flowers with a couple of images from Flower Shop - the larger ones were punched with the Pansy Punch and the smaller ones fussy cut with paper snips. I stamped some leaves with a stamp from Summer Silhouettes and diecut some with the Little Leaves Sizzlits die and added a few white blooms punched with the Boho Blossoms punch. The 'bye' was cut from some, now retired, DSP and Cherry Cobbler cardstock using the Typeset Alphabet Bigz dies and the name from the retired Timeless Type Junior Alphabet dies. A few stamped and punched butterflies from Papillon Potpourri were added to the top corner.
The photo bottom right is the bag/box I made to put the card in.
I will be back in the next few days to show you some of the small gifts I have made for the friends who are leaving this week. x


Friday, 7 June 2013

Happy Birthday


I made this card and money holder for my nephew's birthday which is today. 
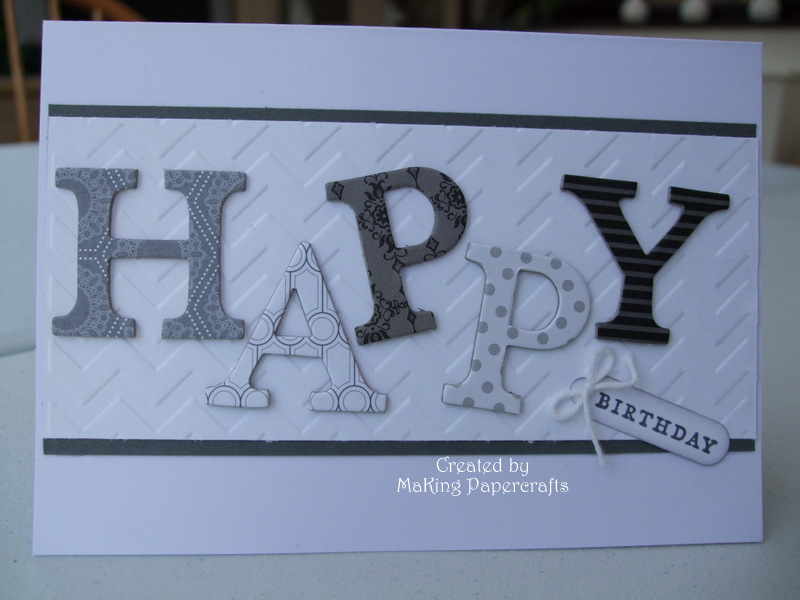
I used the Typeset Alphabet Bigz die to cut out the letters from DSP covered chipboard and mounted these onto Whisper White cardstock which had been run through the Chevron Embossing Folder, matted onto Basic Gray cardstock and fixed to a plain white card blank. The 'birthday' was punched using the Word Window and Jewelry Tag punches with a bow of Bakers Twine added.


The money wallet was made from Basic Gray cardstock with letters made in the same way as above and the top flap embossed.
The closure was made with two buttons cut from the Sweet Buttons Sizzlits die and tied with Bakers Twine

Monday, 20 May 2013

Punch Art Super Heroes


As promised here is the punch art Super Heroes card I have made for my Grandson who will be five next week. At the moment he is Superman mad but is also quite keen on Batman and Robin. I found the punch art Batman & Robin on Splitcoaststampers done by someone called A.Fairchild. To my knowledge he/she has no blog so I cannot point you in any direction but that's who the credit must go to. Superman was found on a blog but the author did not not know who she had CASE'd it from so I am unable to credit the originator of this one.
It is made mainly with the Owl Builder punch (is there anything you can't make with this punch I ask myself!) but also uses the Extra Large Oval, Bird Builder and Circle punches. They are mounted onto frames cut with a die from the Labels Collection Framelits, paper pierced around the shape and the dots joined together with marker pens. The '5' is cut with the Typeset Alphabet Bigz die and the 'today' from the Timeless Type Junior Alphabet die (now retired).
That's all for now but I'll be back tomorrow to show you some little explosion boxes.


Friday, 17 May 2013


I first saw this technique a few weeks ago on the Less is More challenge site but unfortunately I didn't have time to try it for that particular challenge. However I still wanted to have a go and it was an ideal opportunity when I needed a card for a work colleague.
This technique (no idea what it's called) is not the easiest but Lizy Bartaby did a brilliant tutorial on her blog so, if you'd like to have a go, you can see her post here.
I used Fabulous Florets with Raspberry Ripple and Old Olive plus a couple of retired stamps, the Itty Bitty Butterfly punch and the Typeset Alphabet Bigz die for the lettering.The ribbon is Raspberry Ripple Stitched Satin. I also made a bottle tag in the same design but with the recipients name but forgot to take a photo of that!!
Hopefully back tomorrow for the LIM challenge - where has that week gone????


Sunday, 5 May 2013

Simples Sunday Number 2 meets LIM!


Second post of the day is a card I have made for the Less is More challenge which, this week, is to use to opposite colours from the basic colour wheel above. I thought I could get away with combining it with my weekly Simples Sunday post as, although quite time consuming, it really is simple to make.
The idea for Lego bricks is one I've seen lots of times in blogland but have absolutely no idea where it originated from so am unable credit anyone for it. I chose green/red for my colour scheme but, in hindsight, I wished I had used blue/orange because, as anyone who knows me, under normal circumstances these are two colours I would rarely (if ever!) use together! 
The bricks were made using the Large Square and 1/2" Circle punches, inked around the edges with a sponge dauber. The sentiment is from Bring on the Cake inked with a marker pen so I could separate the words and the 'TH' is from Memorable Moments. I cut the 5 from the Typeset Alphabet Bigz die in both Gumball Green and Real Red and glued one on top of the other to give a shadow effect. Before putting the card together I scored a couple of zig-zag lines using the Borders Scoring Plate. Now you may be thinking - why the three coloured dots under the 'happy'? Well, when inking the sentiment with the marker pen, I managed to ink a tiny bit of the letter underneath which left a splodge on the card and the dots cover it up. So now you know!!
This card will be ideal for my Mum to give to my Grandson in a couple of weeks time as he loves playing with bricks. It doesn't seem 5 minutes ago when we were cheering him for putting one brick on top of the other and now he is making high towers and vehicles for his toys to ride on!!
Thanks for stopping by - back tomorrow x


Friday, 19 April 2013

Card Swap Group


It's time for the card swap group again and, this month, I have to send a card to Jane, who is the founder member of the group - no pressure then!!
I decided I would make a personalised card and it turned out nothing like the picture I had in my head. Jane has set us a challenge this month to 'use some DSP that you already have' - no problem there as I probably have enough DSP to paper the walls of my entire house :0)
Originally I was going to make 4 square windows backed with DSP to house the 4 letters so I cut out the 'J' and punched an aperture with my largest square punch to make sure it fitted, then carried on lining up my four punched apertures only to find that the other three letters are somewhat larger and didn't fit!! With my trusty trimmer I set to and made one rectangular aperture from the four squares allowing all the letters to be housed quite comfortably. (Sometimes I really do need to get my brain in gear before forging ahead with things). A few score lines were added before matting onto a Naturals Ivory card base using dimensionals. As I have rattled on for long enough today I won't go through the process of making the card I will just finish with a list of supplies used.
Early Espresso cardstock and DSP, Pool Party cardstock, 'A Little Greeting' sentiment stamp, Itty Bitty Shapes Punch Pack, Typeset Alphabet Bigz die, small Scallop Circle punches and Basic Pearls.
Back soon x

Saturday, 30 March 2013

Scallops


Good morning, well it's snowing - again! A good excuse for me to do a bit of catching up with my blog :0)
This week LIM have a guest designer, Lizy Bartaby, who has set the challenge of 'Scallops'. Lizy's projects are lovely so do pop over to her blog (here) and take a look.
Now I have a confession to make - today's entries were not made for the challenge, they were made a while ago but have just not managed to find their way onto my blog yet! They are scallops so I thought it was an ideal opportunity to kill two birds with one stone - get them on here and enter the challenge! I do love scallops so I'm sure I will be back with more entries specifically made!
The card and treat box were made for a friend's birthday using the Ovals Framelits collection and Bigz Alphabet Typeset dies with a stamp from Mixed Bunch. I used Baja Breeze DSP and, to get the scallops around the central oval, I punched a strip of DSP with the Scallop Border punch and snipped down each scallop to allow me to shape around the oval. The 'H' was cut from chipboard covered with DSP. The larger base oval was run through the Perfect Polka Dots Embossing folder before assembling the card. The treat box was made with the large scallop oval, again from the Ovals Framelits.
My second card is a wedding acceptance card using a stamp from Love & Laughter, silver embossed and matted onto Brushed Silver cardstock. The sentiment is computer generated and is matted onto a Scallop Oval.

Sunday, 3 March 2013

Simples Sunday


I have two cards today for 'Simples Sunday' both on a get well theme although they could both be used for other things as the sentiment is 'feel better' rather than get well!!
The first one is using the apple from Fruit & Flowers, inked with Real Red and Old Olive markers with a small punched heart and rhinestone in the centre. I used the Real Red marker to colour part of sentiment saying 'to make it' (you can see the full stamp below) and the Feel Better is from Sassy Salutations. A tag made with Tiny Tags and the Jewelry Tag punch was added to the stalk of the apple.
'Simples'


My second card uses two sentiments from Petite Pairs and a 'kiss' made from Real Red cardstock, cut with the Typeset Alphabet Bigz die and then run through the Perfect Polka Dots Embossing folder. Some Basic Rhinestones finished the card with a bit of bling.
'REALLY Simples' !!!
Related Posts Plugin for WordPress, Blogger...