Pages

Showing posts with label Perfect Polka Dots Embossing folder. Show all posts

Saturday, 22 February 2014

Something a little different


Well the LIM challenge today, to use metal, is definitely outside my comfort zone! I racked my brains for this challenge - should I use brads, heat embossing, some sort of charm - but none of these really inspired me. Then I suddenly remembered that a while back I'd bought a sheet of thin metal (which actually didn't work for the project I needed it for!) so I hunted that down and came up with this card. Being a Teaching Assistant in Science means that whenever I think of mixing metal with papercrafting I immediately think of magnets so this is where my 'something a little different' comes in - I made the 'Mr & Mrs' panel in the centre into a fridge magnet!! (see picture bottom right - stuck on my conservatory heater)
I used framelits from Apothecary Accents to cut out the aperture and also the 'Mr & Mrs' which had been stamped, with a now retired stamp, in Silver Encore ink. A piece of metal was embossed with the Perfect Polka Dots folder and positioned behind the aperture panel. The congratulations banner was stamped with an Itty Bitty Banners sentiment and cut with the co-ordinating framelit and the metal flowers punched with an Itty Bitty Shapes punch. A few leaves from the Bird Builder punch and some Basic Rhinestones were added to finish the card.
The fridge magnet was made by cutting several shapes from fairly stiff card then glued together to give a much sturdier panel.

Have a great weekend and I'll be back soon
Margaret x


Sunday, 22 September 2013

Simples Sunday & Card Swap Birthday


Today, for my Simples Sunday post, I am showing you the birthday card I made for Alison, a member of the Card Swap Group. I know that Alison is a fan of purple so I used Elegant Eggplant for her card, along with Whisper White.
I coloured the image, from Love & Sympathy, with Elegant Eggplant and Old Olive markers and stamped onto a panel of Whisper White, added a small loop of (retired) ribbon before layering onto Elegant Eggplant which had been embossed with the Perfect Polka Dots folder. The sentiment is from the Hostess set, Simply Sketched, and punched out with the Extra Large Oval punch and layered onto another oval punched from Elegant Eggplant cardstock. A couple of Basic Pearls were added to finish the card.
Thanks for stopping by and pop back tomorrow to see the card and gift box I made for my sister's birthday yesterday.
Margaret x


Sunday, 9 June 2013

Simples Sunday


Today's card is made using the Everything Eleanor stamp set and Melon Mambo and was really simple to make. I started by stamping the flower onto Whisper White cardstock and added the Old Olive stem using my stamp-a-ma-jig, this was then fixed onto a card blank. I cut an aperture in a piece of Melon Mambo cardstock with a die from the Window Frames Collection (you could use any die for this) and then ran it through the Perfect Polka Dots Embossing Folder. After deciding where I wanted my sentiment, I cut the Melon Mambo in two and trimmed a piece of the bottom segment wide enough for the sentiment and fixed to the card blank. I added some stamens to the flower using a Basic Black marker and the sentiment, from Bring on the Cake, is stamped in Melon Mambo with a Basic Rhinestone on either side.
Have a great Sunday and I'll be back soon x

Tuesday, 16 April 2013

CASe'd card


The card today is one that I have CASE'd from the US version of the Stampin'Up! demos magazine - ironically it is an article about CASEing!! Unfortunately it doesn't give the name of the person who designed the card so I am unable to give credit but thank you whoever you are.
I have changed the design of my card slightly and used hearts, punched with the Small Heart punch and run through the Perfect Polka Dots Embossing Folder, rather than flowers which were on the card I CASE'd and I also used slightly different colours. I love this colour combo of Basic Gray and Pool Party and it's one which I will definitely be using again. The ribbon is from the free SAB set and the sentiment from Sassy Salutations.
If you like the style of this card do pop back tomorrow to see a variation on the same theme.

Wednesday, 10 April 2013

Inspired by ... Cakes!


Following the challenge I set myself at the beginning of the week here is another 'inspired by' card, from the same supermarket magazine as the pretty cup & plate that inspired my card here.
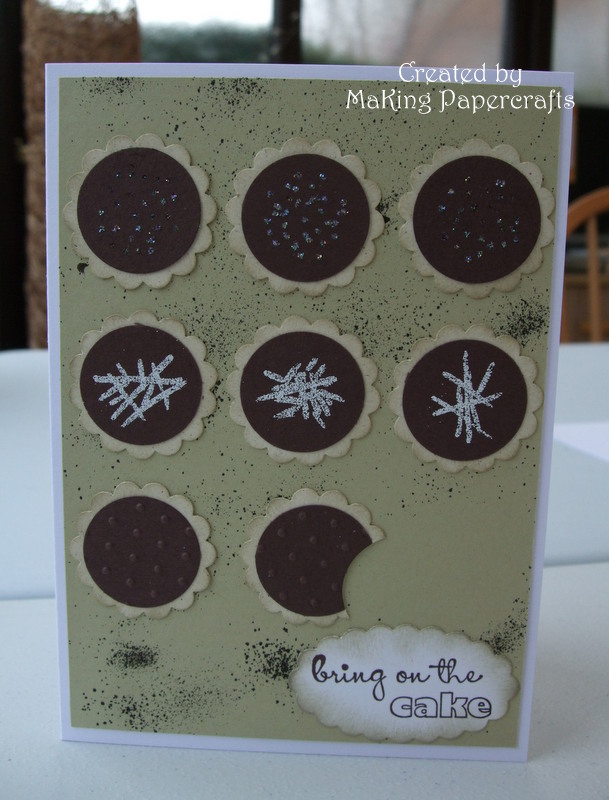
This time it was a tray of chocolate tarts - pictured top right - that screamed Chocolate Chip and River Rock (perhaps Crumb Cake would have been a better alternative to Naturals Ivory though as my pastry looks a bit undercooked!). The tarts were made with the 7/8" Scallop Circle and 3/4" Circle punches with a few different toppings. Two were embossed with the Perfect Polka Dots folder (one with a bite out of it), three with Dazzling Diamonds sprinkles and, to get the white chocolate flakes on the remaining three I drew random lines with a Versamark pen and white embossed them. The chocolate dusting on the tray was done with a Colour Spritzer and Early Espresso marker pen. Matted on to a card blank with a sentiment from Bring on the Cake, punched with the Scallop Oval, and the card was done.
I think my 'personal challenge' will probably only last this week as I am back to school next week and I'm sure I won't find too much inspiration there - but who knows? :0)


Thursday, 12 July 2012

   Hope you're not getting too bored with the thank you cards but with crafting time limited I am having to go with demand at the moment! This one is So Saffron and Very Vanilla with not much stamping. A Very Vanilla Top Note, embossed with the Perfect Polka Dots folder, was matted onto a So Saffron card base and flowers added to the side. The large flowers were made with the 5 Petal Flower and Boho Blossoms punches and the small ones with an Itty Bitty punch with Basic Pearls for the centres. The sentiment was punched with the Oval punch and layered onto a So Saffron Scallop Oval.

Sunday, 17 June 2012

Speedy Box!

Today I needed a very quick token gift to say thank you and this holder was made in around 10 mins using the Two Tags die. I cut two of the tags in Wisteria Wonder and partially embossed them (down to the score line) with the Perfect Polka Dots Embossing Folder, the plain parts were then glued together to form the base. I made a little box to go inside to hold two wrapped chocolate truffles and glued just the base to the holder to keep it in place. The tags were made with stamps from Tiny Tags and cut with the Jewelry Tag punch and the flower made with the Boho Blossoms punch. The little favour box was then held together with a piece of Wisteria Wonder Ruffled Ribbon. A very quick, inexpensive gift but perfect when you just want to say thank you.

Saturday, 2 June 2012


This is a card I have made for my Dad to send to my nephew on his birthday which is later in the week. I took a piece of Very Vanilla cardstock and randomly punched some holes using different size circle punches then ran it through the Perfect Dots Embossing folder before matting onto some Newsprint DSP. This was then matted onto a slightly larger rectangle of Basic Black and fixed to a card blank made from Naturals Ivory cardstock. I stamped the sentiment twice, from the Hostess set Happiest Birthday Wishes, onto Very Vanilla using Basic Black and punched out with two different sized circle punches. The smaller circle was fixed to the larger circle with dimensionals and then the whole thing fixed to the card, again using dimensionals. I finished the card off by adding two Basic Black butterflies cut with the Beautiful Wings Embosslits die. A fairly simple card but I was quite pleased with the finished effect.
Have a great Jubilee weekend - weather allowing of course!!

Saturday, 21 April 2012

How Charming!


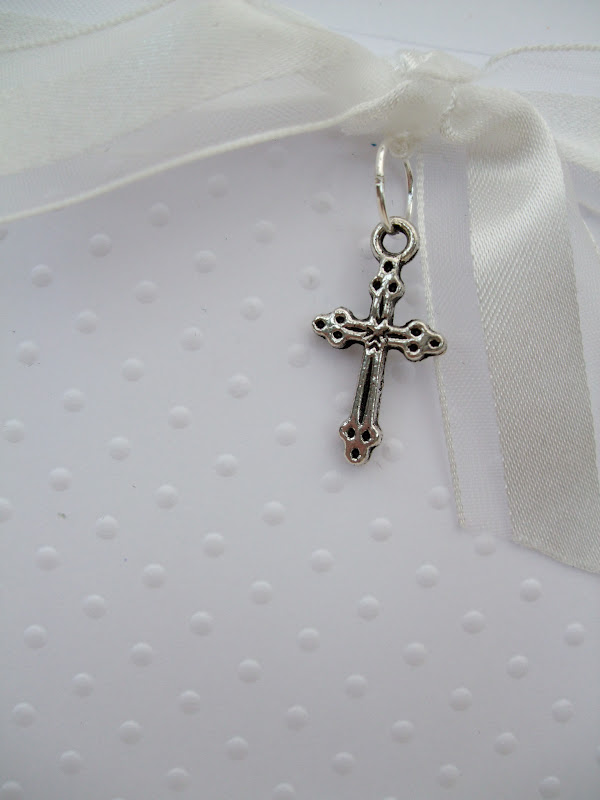
How Charming! is the title of the Less is More challenge this week and the ladies have asked that we use a charm on our cards. I have to admit that this is not something I use and the only time I can remember using them are for some christening cards I made some time ago. It just so happens I had one of the crosses left so I thought it was about time I revisited the christening gown cards that I have made in the past. This one is different in so much as it is a lot smaller and is not personalised (I have put the baby's name along the bottom using die cut letters before). Not really much to tell you about this other than I cut the dress from some fairly sturdy white card, making it up as I went along because the template I had made before was too big, ran the bottom bit of the dress through the Perfect Polka Dots Embossing folder and added a narrow strip of embossed card down the sleeves, really to take the plainness off. The flowers were punched with the Itty Bitty Shapes Pack flower punch and positioned around the neckline, with a small Basic Pearl in the centre. The ribbon tied around the top of the skirt is Whisper White Organza and the cross was stitched onto the knot in the ribbon with white cotton.
I've just looked at this post and it looks like the dress is stuck onto some sort of cream card blank so just to clarify - it is a free standing 'dress' card and the cream colour is just the paint on my shelf and walls!!!
Well I did manage to get a card done for one of the challenges today meaning 2 posts in one morning - oh dear I really must get on with some other jobs now. See you soon x

Wednesday, 18 April 2012


A very quick post today showing you a card made with the Heart to Heart punch. The base card is River Rock with Early Espresso matted on top and then Very Vanilla on top of that. The sentiment was made using two stamps, coloured with an Early Espresso marker - unfortunately the 'love' stamp is now retired but several other sentiments could be used in it's place or it could be computer generated. Several hearts were punched with the Heart to Heart punch from Very Vanilla cardstock and then run through the Perfect Polka Dots Embossing Folder before positioning randomly onto the card. Some Basic Rhinestones were added to give a bit of sparkle.

Saturday, 17 March 2012

Faux Mother of Pearl Mashed Up!


The challenge at the Friday Mashup is to make a project using the sketch (above) or the faux mother-of-pearl technique or 'mash it up' and use both. I decided to use both and came up with the card above.
I began by using the faux mother-of-pearl technique on a piece of Whisper White cardstock, using Wisteria Wonder and Pretty in Pink for the sponging. This was then used for the flower, cut with the Blossom Party die. the tiny flowers from the Itty Bitty Shapes Punch set and the sentiment tag punched with the Modern Label punch. For the base I used a panel of Elegant Eggplant DSP with a piece of Whisper White matted on top which had been sponged round the edges with Wisteria Wonder and then a knot of the Scallop Dots ribbon was placed over the join (I tied the knot so the ribbon was on the plain side and not the dotty side) before fixing to a plain white card blank. The flower was mounted on a circle of Elegant Eggplant, cut with the Circles die and run through the Perfect Polka Dots Embossing Folder, and then positioned onto the card. It doesn't show up very well on the photo but the Faux Mother of Pearl is a lovely technique and gives a luxurious look to a piece of plain card - give it a go and see for yourself!
The weather here is awful today, rain and lots of it, so wherever you are and whatever you are doing have a lovely day and I'll be back soon. x

Monday, 12 March 2012


The two cards I have for you today are using the stamp set Everybunny and are ones that I have made for my grandchildren. Sky is 3 and definitely a 'pink' girl and Conor is only 6 months so I can still get away with using baby blue!
I stamped the bunnies in Crumb Cake then coloured the images using various colours and a blender pen, and then they were punched out with the Extra Large Oval punch. The DSP from the Paper Stacks were embossed using the oval folder from Designer Frames and then glued to a piece of matching cardstock with the oval bunny image placed inside the embossed frame. Some taffeta ribbon was tied around the panel and then the whole thing glued onto a DL card blank. As I didn't want the whole sentiment, I inked the part I wanted with a marker and stamped this above the names which had been cut from the Timeless Type Junior Alphabet dies and run through the Square Lattice (pink) and the Perfect Polka Dots (blue) Embossing folders before being positioned onto the card. On Sky's I added a little pink butterfly which was from the Beautiful Wings Embosslits die.

Saturday, 25 February 2012

Scraps!


The challenge at Less is More this week is 'Scraps' where Chrissie & Mandi want us to use up those card and paper scraps, so I thought I would show you the pictures above of my scraps (well some of them). I'm not very good at using up my scraps, of which I have copious amounts, before cutting into a brand new sheet of cardstock or DSP and have hundreds of 'already cut' flowers, leaves, butterflies, circles and branches but always reach for the punches or dies rather than seeing what I've already got! Well that changed for today and I have made 2 cards for the challenge, although believe me I could have made a lot more.


I started by making a card blank in Certainly Celery and then cut a piece of DSP slightly smaller and fixed it to the card base. For the top layer I used a piece of Whisper White, slightly smaller than the DSP, cut out holes with different sized circle punches and layered this on top. I collected all my scrap flowers which had been cut with the Boho Blossoms punch, Itty Bitty punch and the 5-Petal Flower punch and decided to use a Very Vanilla and Pumpkin Pie combination (the only thing I had to newly punch were the two small circles to go in the centre of the tiny flowers) These were assembled and curled slightly before positioning 
in the apertures using dimensionals. A small basic pearl, a couple of branches (from the 2-Step Bird punch) and the sentiment were added to finish the card.


My second card is along the same lines but using some of my many pre-cut butterflies (Beautiful Wings Embosslits). This time the colour combo was Pink Pirouette and Elegant Eggplant, with the addition of a bit of Vellum cardstock, and I embossed the Whisper White cardstock with the Perfect Polka Dots Embossing folder. For this card I mounted the white embossed layer on dimensionals and stuck the butterflies to the card base, rather than the other way round, to give a different diemension. Basic Rhinestones were added to the butterflies for a bit of sparkle.


On a final note I would like to add that no new pieces of cardstock or vellum were cut or damaged in the making of these cards :0)
Have a great weekend and I'll be back soon x

Sunday, 5 February 2012

Aqua Again!

Today when I went into my craft room there was a Baja Breeze Scallop Circle sitting on my desk (left over from the frame I made on Saturday for the Aqua Less is More card) so I decided I would use it and have another go at the challenge. I started by masking off an area on a card blank and stamping the tiny flower, from Flight of the Butterfly, in Baja Breeze. I then placed it on my scoring board and scored a line either side of the border to give a negative embossed line. The Scallop Circle was run through the Polka Dots Embossing Folder and the edges inked before placing onto the stamped border. I then used a piece of SU Vellum cardstock to cut and emboss the butterflies with the Beautiful Wings Embosslits die and placed these onto the card and added some Basic Pearls. The sentiment is one from Flight of the Butterfly and this was stamped in Baja Breeze. This was quite a quick card to make and used up some scraps which would otherwise have ended up in the bin!

On Saturday night it was so cold and I was nice and warm in my living room so, as I didn't really want to move, I did what I do best (and far too much of!) and trawled through a lot of my favourite crafting blogs. I came across someone who had used a technique I was not familiar with - the Bandana Technique - so I diverted to YouTube to investigate. I suppose the nearest thing to compare it with is wax resist but using a white pencil. Now I know I have several coloured pencils and I'm sure one of them has to be white but, in my grand tidy up, I have put them 'somewhere' and could I find them? Well you know the answer to that. As I had already stamped my flower from Greenhouse Garden, and not to be beaten, I decided to try emboss resist using white embossing powder instead and this is the result. No masterpiece but acceptable - ISH. Finished off with Baja Breeze Seam Binding and a sentiment from Perfect Pairs.

Saturday, 28 January 2012

Variation on a Sketch!


This afternoon my daughter asked me to make her a baby card for her friends new baby who arrived yesterday and, as she needs it very soon, I decided to make it along the same lines as the one I made earlier for the Less is More challenge (scroll down to previous post to see that one!) It was made in exactly the same way but using Pretty in Pink DSP, from the Subtles Paper Stack, and the little bunny stamp from Perfect Postage and tied with Whisper White Organza ribbon. I stamped the sentiment and underneath put the baby's name which I made with the Timeless Type Junior Alphabet dies, run through the Perfect Polka Dots Embossing Folder, and dotted the'i' with a Basic Pearl. 
I have to say I'm not very good with pale pink and always seem to get a mental block when it comes to designing anything with it so I was really glad I didn't have to start from scratch with the idea!

Saturday, 24 December 2011

Merry Christmas


Well Christmas Eve is here again - where has the year gone? One last post before the big day and my entry for the Simply Stampin' Challenge which this week, believe it or not, is Christmas! This is the card that I made for the lovely ladies who come to my classes and is using a stamp from Pines & Poinsettias, coloured with Early Espresso, Old Olive and Cherry Cobbler, punched with a circle punch and mounted onto a larger circle of Cherry Cobbler. The card base is Cherry Cobbler with a rectangle of Whisper White, first stamped with a sentiment from 'Heard from the Heart' and then run through the Perfect Polka Dots Embossing folder. A knot of Cherry Cobbler Seam Binding was fixed to the Whisper White before matting onto the card blank and the circular embellishment added.
All that remains now is to wish you all a very Merry Christmas and a Happy New Year x

Wednesday, 9 November 2011


This is a card I made for the christening of a friend's niece. I embossed a panel of Whisper White with the Perfect Polka Dots folder and matted it onto some Brushed Silver cardstock and tied round some Whisper White Organza ribbon. This was then positioned in the rectangle I had previously embossed, using my score board, on a large white card blank. The sentiment was embossed in silver and cut using the Decorative Label punch and another label was punched in Brushed Silver, cut in half and placed behind, with a couple of Basic Rhinestones added. To personalise the card I cut the name using the Timeless Type Junior Alphabet dies and added a tiny butterfly from the Beautiful Wings Embosslits die. The cross was from my own stash. The bag/box to hold the card was made with some plain white cardstock with some butterflies added to the front and a handle made with the Lace Ribbon Border punch and attached with some pink rhinestone brads.

Tuesday, 1 November 2011

Treat Pouches


Here are two little treat pouches I made using the Two Tags die. It is very difficult to credit anyone with this as there are so many similar ones across the web that it's virtually impossible to find out who was the originator but, suffice to say, the original idea was definitely not mine! It is made by cutting two of the larger tags on the die and gluing them together at the bottom and decorating as you wish. Here I have used one of the stamps from Pennant Parade to make the 3D Christmas tree on Real Red and the other with the Polar Bear from Polar Pals on Old Olive which was embossed in the Perfect Polka Dots folder. A piece of ribbon and a piece of the brand new crochet trim was used to tie the top of the pouch.
Related Posts Plugin for WordPress, Blogger...