Pages

Showing posts with label 2013 Techniques. Show all posts

Tuesday, 2 July 2013

Card Swap Group Birthday


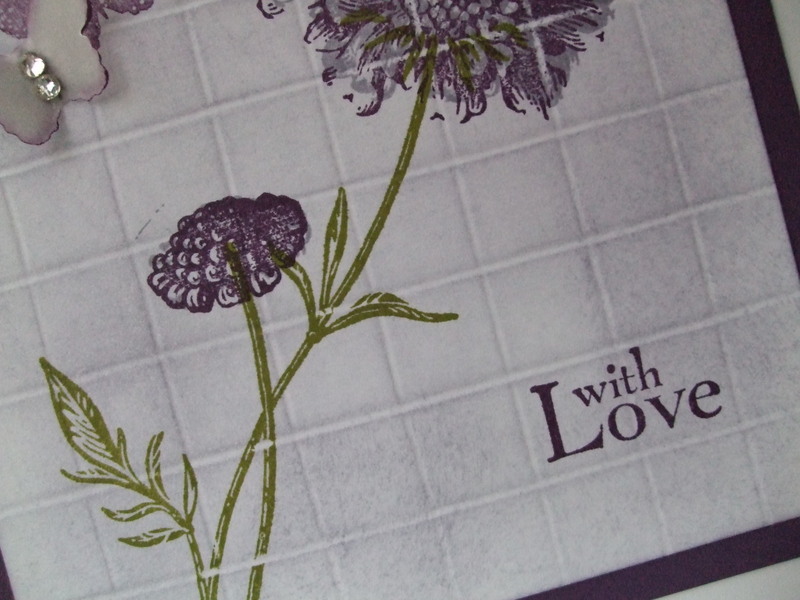
Today's card is another one I made using the 'Tile Effect' technique and was made for Michelle, a member of the card swap group, for her birthday last week.
The top section of a Whisper White panel was scored at 1cm intervals to make the tile effect and lightly sponged with Crumb Cake. The flowers from Stippled Blossoms were then stamped using Raspberry Ripple and Pink Pirouette with the leaves in Old Olive. A sentiment from Happiest Birthday Wishes was added and a knot of Raspberry Ripple Stitched Satin ribbon tied around the panel before matting onto a Raspberry Ripple card blank.
The Stippled Blossoms flowers have a sort of vintage-y look about them so I think they really suit this technique.
Have you had a chance to browse the new catalogue yet? What a lot of lovely new products there are and my 'wish list' grows each time I look!
If you would like to purchase anything (and take advantage of my free p&p offer) then please get in touch and I'll be happy to help.
Until next time - Happy Crafting

Margaret x


Tuesday, 25 June 2013

Tile Effect


Today's card is using a technique which I believe is called the 'tile effect' and one which I have seen lately around blogland. I thought I would give it a go and am quite pleased with the result.
I started with a piece of Whisper White cardstock and scored a grid at 1cm intervals to create the 'tile effect'. Once this was done I sponged the cardstock with Wisteria Wonder before stamping the images from Field Flowers in Elegant Eggplant and Old Olive. Unfortunately, as you can see, I was in too much of a rush to use my stamp-a-ma-jig so the stems disappear a little too much into the flower heads!! A butterfly was stamped in Elegant Eggplant and another, punched from Vellum with the Bitty Butterfly Punch and sponged with ink, was placed so it overlapped. The sentiment, also from Field Flowers, was stamped in the bottom corner before matting and layering onto Elegant Eggplant cardstock and a white card blank.
Tomorrow I will be back with another very easy CAS card using new stamps, a new punch and a new colour!


Monday, 10 June 2013

Spotlighting


I bought the Pleasant Poppies background stamp a few weeks ago and have only just got round to using it! I have seen this technique all over blogland and was wanting to have a go so here is my attempt.
I stamped the poppies onto Whisper White using Staz-on and then again on a smaller piece of cardstock. The image was coloured with a blender pen using Raspberry Ripple and Old Olive inks before punching out with the largest circle punch. The larger panel was matted onto Raspberry Ripple cardstock and I added some Stitched Satin Ribbon tied in a knot before placing on a white card blank. The coloured circle was fixed in place with dimensionals and a sentiment added.
I have another design to show you tomorrow using the same stamp so do pop back and take a look.

Monday, 27 May 2013

More Backgrounds


Apologies for the late post today but housework and gardening called - isn't it a shame that these things get in the way of crafting? :0)
Anyway this evening I found some cardstock that I had been playing with the other day using the clear block background technique so I rustled up these two cards. If you read my post the other day you will know that I used rubbing alcohol for those backgrounds but these were done with good old fashioned water. Using water does mean they take much longer to dry - hence why I forgot all about them. I won't bore you with the details as you can use any colours and stamp sets you fancy, I just used what I did because I hadn't put them away!!
As I am off work this week my posts may be a little erratic as I have a list of things I need to do but I will be back.

Friday, 24 May 2013

Playing with backgrounds


Yesterday I had a little play making backgrounds with clear blocks. I have used this technique a few times in the past but a fellow demo, Lynne Fahey, has recently done a video tutorial on this technique and it spurred me on to have another go. Lynne's tutorial can be found here.

Lynne used water to spray the block but, as my only spritzer bottle is filled with rubbing alcohol I used that for these cards. A word of advice - if you haven't tried this technique before I would advise using water as the alcohol tends to disperse the ink a little too much and can leave white spaces. I quite like this random effect but it would not be to everyone's taste!
The card at the bottom (with the tree) was spritzed with SU's Smooch Spritz which gave a shimmery finish seen better in the photo below (but also left a lot more white patches!!)
Go on, have a go - the worst that can happen is you waste a bit of cardstock :0)


Saturday, 11 May 2013

LIM One Layer


Good morning everyone - what happened to summer? Last weekend it was a t-shirt, this weekend it's a jumper and fleece!!
As always the first thing I do on a Saturday morning is look at the challenge over at LIM which, this week, is a One Layer card with a Coloured Card Blank. My first attempt was using More Mustard but I wasn't happy with that one so I did another using Sahara Sand which I was much happier with. Sahara Sand is a colour I rarely use for some unknown reason and I can only describe it as somewhere between grey and kraft but with a hint of green (and one which doesn't show up too well in photos!).
I used some masking on this card and started by stamping the flower, from Fabulous Florets, in Raspberry Ripple. I then added post-it note masks onto the flower and in a strip across the card before stamping the leaves in Old Olive. After removing the masks I drew two lines across the card (where the post-it mask had been) with a Raspberry Ripple marker pen and then scored some lines on either side. The sentiment, from Bring on the Cake, was stamped in Raspberry Ripple and I added a bit of shading to the leaves with a Sahara Sand marker and a bit of sparkle to the flower with Dazzling Diamonds.
I have a lot of jobs to catch up on today but, when I've finished those, I could well be back with another card for the challenge - watch this space :0)
Until next time, have a great weekend and keep warm!!


Wednesday, 6 March 2013

Summer Silhouettes


I thought you may be getting a little fed up with seeing treat boxes so I have a card to show you today.
I used one of the Window Frames Framelits dies (still available in the Spring Mini) to emboss the Naturals White cardstock rather than cut it. You can do this by placing the non-cutting side of the die onto the card and using the crease pad in place of a cutting plate. I then did some piercing around the frame with one of the templates in the Essentials Paper Piercing pack just to add some detail. To do the stamping I used the same die to cut an aperture in a piece of copy paper to use as a mask and placed this over the embossed frame. Once the mask was in place I stamped the leaves from Summer Silhouettes in Old Olive and then the flowers (from the same set) in Raspberry Ripple. After removing the mask a retired sentiment was stamped and the panel matted onto a Naturals White card blank using dimensionals.

Friday, 15 February 2013

A little bit of Sponging


For today's card I used the scrap left over from a card I made with the Labels Collection Framelits. After cutting out the label you are left with a piece of card with an aperture so why not put it to good use?
I positioned this onto a piece of Whisper White, fixed down with post-its, and then sponged the aperture with Raspberry Ripple ink. I deliberately gave it a lighter touch towards the centre to add a bit of depth. Once this was done I cut another aperture, this time in copy paper, and placed over the sponged area before stamping an image from Summer Silhouettes in Basic Black. (A little tip: I find that when you are stamping with a mask if you use copy paper rather than cardstock, your image stamps much closer to the edge). The panel was then matted onto cardstock - which was SUPPOSED to be Primrose Petals but turned out to be Rose Red (I really must sort my scraps box out!!) - some Raspberry Ripple Stitched Satin ribbon and a sentiment from Bring on the Cake added before fixing to a plain white card blank.
Well yesterday saw me confined to bed, a little tummy bug came to visit in the early hours of Thursday morning and rendered me useless for the rest of yesterday. I don't remember the last time I slept so much!! Very annoying, not least because I had a group of ladies coming for a crafting session who I had to hurriedly phone yesterday morning to cancel. Am a lot better today apart from feeling like I've been kicked around a field by a group of rugby players!!!

Wednesday, 13 February 2013

Butterfly Sponging


If you are a regular visitor to my blog I'm sure you'll know by now that I'm a 'plain and simple' girl (in more ways than one!!!) so today's card is not my usual style but, sometimes, you just have to push the boat out a little.
Not a quick card by any means but a good one if you need to take your mind off other things for a while!
I started by cutting the large butterfly form the Beautiful Buttterflies Bigz die in both cardstock and copy paper. Using the card mask, I fixed this to a piece of Whisper White with post-its and sponged through the aperture with Wisteria Wonder. After removing this mask I positioned the paper mask over the image (again fixing with post-its) and pressed down onto the En Francais background stamp which had been inked with Elegant Eggplant.
This is where my design changed - I was going to use the sponged & stamped butterfly as the panel but it looked a little flat so instead I carefully cut this out using sharp paper snips. I then repeated the sponging step onto another piece of Whisper White but this time using Elegant Eggplant. The cut butterfly was then positioned on top of this image using a thin line of wet glue down the centre of the body, to enable the wings to be folded upwards, and some Basic Pearls added.
I won't bore you to death by explaining how the card was put together as it's self-explanatory but the Elegant Eggplant cardstock panel was stamped with the butterfly from Bloomin' Marvelous, the sentiment is from Curly Cute and the ribbon is Wisteria Wonder Ruffled ribbon.
I apologise for the lack of posts this week but, because I have been busy making things, I've been too busy too blog!!! Hopefully I'll have a lot to show you next week :0)

Saturday, 9 February 2013

One Layer Music


A bit late with my entry this week for the Less is More challenge, which is a 'One Layer - Music' card, although better late than never as they say!
Now the only thing I have which is anything to do with music is the Music Notes wheel so I was trying to think of a song title to use as a sentiment - no luck until I stumbled across this one from Made for You. Singing away to myself I couldn't remember who sang it and then it came to me - Kylie Minogue and Jason Donovan. I have just found out, by doing a Google search, that this was actually recorded in 1988 and am now feeling very, very old!!!!
Anyway on to the card - I know this may look as though I have cheated with the 'one layer' but I haven't - honestly. I decided to use a technique which I showed you a while ago and, which I believe, is called 'Quick and Easy Focal Points'. I started by cutting the sticky piece of a post-it note in a rectangle 2cm x 5cm and placed this onto a plain white card blank before stamping across the card with the Music Notes wheel in Basic Black. I removed the mask, drew a solid line around the box with a Basic Black marker pen and then stamped the sentiment inside the box using my Stamp-a-ma-Jig. I added a tiny rhinestone to the 'i' just to add a little something (you are allowed minimal embellishments to a one layer card challenge and they don't come much more minimal than this!!).
Thank you for taking the time to visit and do come back tomorrow for the very first of my 'Simples Sunday' cards. x

Friday, 25 January 2013

Sale-a-Bration Goodies


Another card to show you using SAB goodies. This one is made using my acrylic blocks with Pool Party, Island Indigo and Tangerine Tango for background stamping. This is an easy technique - just press your acrylic block firmly down onto your ink pad and then onto your cardstock. Mary Fish (at Stampin' Pretty) has just posted a video on her blog showing you how to do this so, if you would like to see it, click here. I stamped the 2 sentiments from Vintage Verses in Staz-on and decorated the card with a button from Sycamore Street Ribbon & Button pack, threaded with Baker's Twine and some simple flowers punched, from a design in the Sycamore Street DSP pack, with the flower punch from Itty Bitty Shapes Punch Pack (available from the main catalogue). The Whisper White panel is matted onto Pool Party cardstock and then onto a white card blank. 
This technique is one you need to play around with and I can guarantee you will never make 2 cards exactly the same!

Saturday, 19 January 2013

Friends at LIM


Today the challenge at Less is More is on the theme of 'Friends' and this is my entry. Yesterday I was watching a video on YouTube called 'Quick & Easy Focal Points' so I thought I would give it a go. (If you would like to see how it's done the video can be found here). I started by stamping a retired stamp, in Elegant Eggplant, straight onto a 12cm square card blank, this was then masked off using a post-it note cut slightly bigger than the sentiment. The leaf stamp from Summer Silhouettes was inked with Certainly Celery, stamped off and then stamped onto the card with the flowers stamped in Perfect Plum (I don't think I could have cleaned my small stamp properly last time I used it because they look a little redder than the larger flowers!). The mask was then removed before drawing two straight lines part way across the card using a ruler and an Elegant Eggplant marker pen. The card was finished off with a strip of Elegant Eggplant cardstock, punched down one side with the Scallop Trim Border punch.
This morning saw me shovelling snow in an attempt to dig my car out and clear my drive and, guess what, it's snowing again with even more forecast for tomorrow. Was it worth it I ask myself???
Until next time I will leave you with a couple of snowy photos of my garden - very pretty but I wish it would go away :(0


Related Posts Plugin for WordPress, Blogger...