Pages

Showing posts with label Happiest Birthday Wishes. Show all posts

Tuesday, 15 October 2013

Gift set


Today I have a matching set to show you which I made for a friend's birthday. The card, although not entirely CASE'd, was hugely inspired by a card I saw on Monica Gale's blog a couple of weeks ago. However, when I looked for Monica's post, I read that she had CASE'd it from Catherine Pooler, a Canadian demo. I have looked for the original post and I can't find it but Monica's card can be seen here.
The colour combo is Pistachio Pudding and Baked Brown Sugar which I think look gorgeous together. The little 'envelope' top right holds a gift card and the treat box holds some yummy chocolate truffles.
I used the Chalk Talk stamps and framelits as well as a stamp from Happiest Birthday Wishes, along with the Extra Large Oval Punch, Large Oval Punch, Scallp Oval Punch and Bitty Butterfly Punch.
Margaret x


Tuesday, 2 July 2013

Card Swap Group Birthday


Today's card is another one I made using the 'Tile Effect' technique and was made for Michelle, a member of the card swap group, for her birthday last week.
The top section of a Whisper White panel was scored at 1cm intervals to make the tile effect and lightly sponged with Crumb Cake. The flowers from Stippled Blossoms were then stamped using Raspberry Ripple and Pink Pirouette with the leaves in Old Olive. A sentiment from Happiest Birthday Wishes was added and a knot of Raspberry Ripple Stitched Satin ribbon tied around the panel before matting onto a Raspberry Ripple card blank.
The Stippled Blossoms flowers have a sort of vintage-y look about them so I think they really suit this technique.
Have you had a chance to browse the new catalogue yet? What a lot of lovely new products there are and my 'wish list' grows each time I look!
If you would like to purchase anything (and take advantage of my free p&p offer) then please get in touch and I'll be happy to help.
Until next time - Happy Crafting

Margaret x


Friday, 21 September 2012

Mixed Bunch Birthday


My apologies for being AWOL again! The saga still continues with Dad and, added to that, I've had a streaming cold for 10 days which doesn't seem to want to go - I think I must be looking after it too well :0) Hence not too much crafting getting done at the moment. However it is my sister's birthday today and this is a card I made for my Mum to give to her. I used a couple of the stamps from Mixed Bunch, which was available in the Summer Mini, along with the co-ordinating Blossom Punch both of which, I can tell you, will be making a reappearance in the brand new annual catalogue available from 1st October. I used one of the new In Colours, Summer Starfruit, which was stamped off to get some paler images. The sentiment is part of a stamp in the Happiest Birthday Wishes Hostess set, coloured with a marker and teamed with anotehr stamp from For my Family and punched with the Extra Large Oval Punch. A strip of cardstock punched with the Dotted Scallop Ribbon punch was added across the centre of the card, the central punched flower was added with dimensionals and Basic Pearls finished the card. I also added a bit of stamping to the envelope by using a post-it note as a mask.
Hope to be back soon, have a lovely weekend x

Saturday, 2 June 2012


This is a card I have made for my Dad to send to my nephew on his birthday which is later in the week. I took a piece of Very Vanilla cardstock and randomly punched some holes using different size circle punches then ran it through the Perfect Dots Embossing folder before matting onto some Newsprint DSP. This was then matted onto a slightly larger rectangle of Basic Black and fixed to a card blank made from Naturals Ivory cardstock. I stamped the sentiment twice, from the Hostess set Happiest Birthday Wishes, onto Very Vanilla using Basic Black and punched out with two different sized circle punches. The smaller circle was fixed to the larger circle with dimensionals and then the whole thing fixed to the card, again using dimensionals. I finished the card off by adding two Basic Black butterflies cut with the Beautiful Wings Embosslits die. A fairly simple card but I was quite pleased with the finished effect.
Have a great Jubilee weekend - weather allowing of course!!

Thursday, 31 May 2012

Another Milestone Card


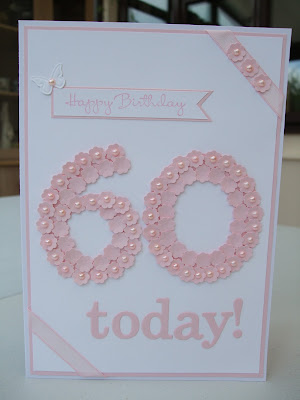
This is another commissioned card to celebrate a colleagues 60th birthday with the brief being - pastel with a LARGE 60!!!
The card was made with Pink Pirouette and Whisper White with a dash of Pink Pirouette Taffeta Ribbon. To make the '60' I printed out the numbers from the computer, cut them out and used this as a template to draw onto the pink cardstock, which was then cut out to use as a base for the flowers. These were punched with an Itty Bitty Shapes punch and shaped by pressing the base of my white gel pen into the centre of the flower before glueing to the card numbers. I added non-SU pink pearls to the centres on the outside row of flowers. The sentiment is from the Hostess set, Happiest Birthday Wishes, and is matted onto Pink Pirouette cardstock and the word 'today' is cut with the Timeless Type Junior Alphabet dies. The tiny butterfly is one from the Beautiful Wings Embosslits die.

Thursday, 24 May 2012

Hip-Hip Hooray!


Where is the time going - it just seems to be running away at the moment. I have been busy making cards for orders but cannot post them on here just in case the recipients visit so, today I am showing you a card which I made a while ago. As with most of my punch art cards this was copied but I haven't a clue who came up with the original idea. It was made with a variety of SU punches and dies using Basic Gray, Whisper White and a touch of Basic Black and Pink Pirouette. After assembling the hippo he was matted onto a Top Note diecut which had been inked around the edges and then layered onto a white card blank. I chose the sentiment because of the 'hip-hip' as in hippo!! Both of the sentiments are from the hostess set, Happiest Birthday Wishes.
Isn't it lovely to see the sun, but the best bit is being able to throw open the doors and windows - at last!!


Thursday, 17 May 2012

Parcels!


Quite a simple card to show you today using the new Twitterpated DSP from the Summer Mini. I punched three different patterns of DSP with the Square punch to make the parcels and added a strip of Wild Wasabi down the front as the ribbon. The 'bows' were made with cut off pieces from the Lace Ribbon Border punch and glued onto the top of the punched squares. The parcels were added to a piece of Whisper White cardstock which had been matted onto Wild Wasabi and some Bakers Twine was wrapped around one end before fixing on to a white card blank. The tag is a stamp from Happiest Birthday Wishes Hostess set, tied to the Bakers Twine with a bow, and the sentiment is a SAB stamp (now retired).
I am not sure when I will be posting next as I am away at Michelle's Retreat this weekend - I am so looking forward to it. If last year is anything to go by I probably won't get much crafting done but, one thing is for sure, I will be in the company of some lovely people and will definitely eat a lot!!! So please check back in because, even if I don't get a chance to post over the weekend, I will be back at the beginning of the week and I'm sure I will have some lovely things from the Retreat to share with you. 
Have a great weekend and I'll be back soon x

Sunday, 13 May 2012

Challenging Colours!

The Simply Stampin' challenge this week is certainly what you would call a challenge - the DT want us to come up with something made with Regal Rose, Real Red, Island Indigo and Whisper White. At the end of the post they said that they hoped the colour challenge wouldn't have us 'running for the hills' - well the only reason I didn't is because the hills are too far away!!!!
Definitely not a colour combo I would choose but it gave me a chance to try something I've seen done many times before but never actually got round to doing. I practised with circles but you could use any shape you like for this technique and, having seen the finished effect, it's definitely something I'll be doing again (just maybe not these colours!) 
I started by punching different size circles from the coloured cardstock and then arranged them onto a piece of Whisper White card, when I was happy with how they looked I glued them using a wet glue to make sure they were properly stuck all over. I then simply ran the whole thing through the BigShot in the Square Lattice Embossing folder. This was then matted onto a piece of Island Indigo cardsock and then onto a card blank. The sentiment, from the Hostess set, Happiest Birthday Wishes. was stamped in Island Indigo, cut into a banner and inked around the edges with a sponge dauber.

Here is a close up of the finished effect. This particular embossing folder gives a lovely texture to the cardstock and it actually looks like the colours are painted on rather than glued on pieces of card!                                   
*If you saw my previous post  you will know that a lady called Jo Street (her post is here) has made an appeal for donations of cards to sell, to raise money for the Candlelighters Appeal, at a Ladies Night on the 31st May. Sadly it is too late for 3 year old Florence for anything other than to receive the vital care & support from Candlelighters that she and her family need at this desperate time. As a Granny to four toddlers it breaks my heart to think what this family must be going through so I urge you, even if you only send one card, please get in touch with Jo. Her contact details are on her post that I've linked to above. PLEASE let's help Jo raise lots of money.
Whilst having a look at the Candlelighters website I came across this video which Scalby School Girls recorded last year in aid of the charity - take a look

Monday, 7 May 2012

Unashamedly CASE'd!


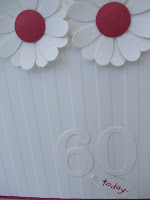
Today's card is one which I CASE'd from Lynney, a fellow SU team member (you can see her card here). As soon as I saw it I knew I was going to have to make one as it is so clean and simple but at the same time beautiful, so thanks Lynney for the inspiration.
I have made mine for a work colleague who will be 60 very soon and so have added a bit to the card. I started with a Rose Red card base and then added the Whisper White layer which had been partially embossed with the Stripes Embossing Folder. The flowers are cut with the Blossom Party die (this was in the Spring Mini so is no longer available but hopefully it will make it into the main catalogue in October) and I slightly curled the petals before glueing two together and adding to the card. The centres are punched with the 1/2 inch punch and rounded, I do this by placing the circle on the pricking mat and going round in a circular motion with the end of my pricking tool, these were then placed in the centre of the flowers using a dimensional. The sentiment is from the hostess set 'Happiest Birthday Wishes'. As it is a special birthday I cut the numbers from Whisper White using the Timeless Type Junior Alphabet die and added a tag saying 'today' punched with the Jewelry Tag Punch, finished with a Basic Pearl.
Have a lovely Bank Holiday and, now it's out of the way, let's hope we start to see some warmer weather :0)

Monday, 30 April 2012

Last Day for Cupcakes!


Yes it's the very last day you can get your hands on the lovely Create-a-Cupcake set from the Spring Mini - nobody knows whether this will be available in the future so, if you really want it, there is NO time to waste!
I was asked to make a personalised birthday card with cupcakes on it so this is what I've come up with. I started by stamping the name in Wisteria Wonder, using the Varsity Alphabet set and my Stamp-a-ma-Jig, along the bottom of a piece of Whisper White cardstock. The cake cases were then stamped on top of each letter in Pretty in Pink and the Perfect Plum Bow added. The frosting on the cakes was done with a variety of different methods - Heat'n'Stick with Dazzling Diamonds, clear embossing and silver embossing - and then cut out by hand (there is a co-ordinating punch to go with the set but unfortunately I don't have it!) After adding some decorations they were set aside until the rest of the card was finished. I stamped the sentiment from the Happiest Birthday Wishes Hostess set down the LH side and tied a knot of Wisteria Wonder Ruffled ribbon next to it before matting onto Wisteria Wonder cardstock and then onto a DL card blank. The frostings were then positioned onto the cakes using dimensionals and a few randomly placed Basic Rhinestones were placed underneath the letters.
With the 'going out' of the Spring Mini there comes the brand new Summer Mini which starts tomorrow. There is an ILWS Blog Hop, starting at 10a.m, to celebrate it's launch with lots of inspiring projects to show you - so come back tomorrow (oh and set aside a few hours to do all that blog hopping!)

Monday, 16 April 2012


This card is 'sort of'' case'd from Dawn Griffith, an American SU demo, using her idea but different supplies. For my card I used Old Olive DSP from the Brights Paper Stack for the backing and a strip of Certainly Celery and Whisper White cardstock, punched at the bottom with the Scallop Border punch, to go across the card. The flowers were cut with the 5-Petal Flower punch and the centres with a circle punch and rounded to give a raised effect. The sentiment is from the Hostess set Happiest Birthday wishes stamped in Old Olive. A simple but effective card which could be done in any number of colours using any DSP - I think I may be making some more of these!
Back to work today so maybe not quite so many cards to show you over the next few days but I'll try my best :0)

Saturday, 7 April 2012


Made with my grandson in mind here is a Case'd punch art dinosaur card. As I said previously it is practically impossible to track down the clever crafter who came up with the original but thank you whoever you are!
Again using all SU supplies and various punches (mostly ovals and circles for this one) with his neck and spines being cut out by hand. The sentiment is 'mix'n'match' from three different stamps in the Happiest Birthday Wishes Hostess set and coloured with a Basic Black marker.
Roman, my grandson who is nearly 4, loves dinosaurs and although he still has difficulty saying some everyday words clearly, he can say Tyrannosaurus Rex as clear as a bell!! 
I will be back tomorrow with some little Easter Treats I have been making and I am afraid the LIM challenge will have to wait till later in the week as I am having family visiting over the weekend so no time for card making! I hope whatever you are doing that you all have a lovely Easter weekend x

Monday, 2 April 2012

Just Believe


I made this little set for a work colleague whose birthday I missed - in truth I didn't know it was her birthday so this had to be made in a hurry to give her the following day! For the card I used two stamps from Just Believe inked with Certainly Celery and the smaller stamp stamped off to give a shadowy effect. Three flowers from the Boho Blossoms punch in Daffodil Delight and a tiny Certainly Celery butterfly, from Beautiful Wings Embosslits die, were added along with a sentiment from Happiest Birthday Wishes and then matted onto a piece of Certainly Celery cardstock. A length of So Saffron Taffeta ribbon was tied around and knotted before layering onto a card blank. I added a few Basic Pearls to finish the card. The Mini Milk Carton was made using the die and the same stamps and ribbon used for the card, with the addition of some stamps from Tiny Tags punched with the Jewelry Tag punch. I made the card below from a reject but can't for the life of me remember why I rejected it!!


Same idea but this time it was matted onto Certainly Celery DSP, with Old Olive Narrow Taffeta ribbon and just a couple of white butterflies.

Sunday, 1 April 2012

Playing!


I made a couple more cards for the Less is More challenge for no other reason than all my pink, green and grey stuff was out for the card I made yesterday and I wanted to 'play'! The first card really was inspired by the picture provided by Chrissie & Mandi for this week's challenge, I kept looking at it and trying to think how I could make some gerberas. As it happens I think they look more like daisies but that's sometimes what happens when you play, the end result not being quite the same as the picture in your head. I used the smallest flower on the Flower Daisies die, cut from Pink Pirouette and folded over, then punched the large flower shape with the Boho Blossoms die in Certainly Celery and cut it to make the base, the stems are just a strip of Certainly Celery gently teased around to give a curve. All the flower pieces were lightly inked with a sponge dauber to add a bit of depth. For the border I used the Sandy Speckles Wheel with Basic Gray then masked this and sponged over Pink Pirouette before positioning the flowers, added a knot of Pink Pirouette Taffeta ribbon and a sentiment from Happiest Birthday Wishes stamped in Basic Gray. Now onto my second card which really was playing!


In my kitchen I have a pot of pink hyacinths, bought for me by my daughter for Mothers Day and, again, I keep looking at them thinking how can I make something that looks like a hyacinth. So that's where the playing comes in, I took the flower stamp from Flight of the Butterfly, a Pink Pirouette stamp pad and a piece of Whisper White and stamped, then over-stamped until I was (reasonably) happy with the shape. I then added the stem using a stamp from Greenhouse Garden and some leaves with a stamp from the Build a Blossom set. The stem and leaves were given a touch of shading using a Crumb cake marker as they looked a little flat then the panel was matted onto Basic Gray and Pink Pirouette cardstock before placing in the centre of a plain white card blank with a knot of retired Basic Gray Taffeta ribbon added to the bottom corner. In hindsight I think it would have been better to have stamped the flower using a mixture of Pink Pirouette and the slightly darker Pretty in Pink as the 'hyacinth' does look a little flat and insipid but that's what palying is all about - I'll know better next time :0) 
I hope you are all having a lovely weekend, the sun is shining beautifully here but boy is it cold!!!!

Saturday, 10 March 2012

Script Challenge


I have two cards today for the Less is More challenge, which this week is 'Script'. The card on the left is using French Foliage and En Francais with a sentiment from Petite Pairs and is all stamped in Old Olive. I began by stamping off the En Francais stamp before stamping the image down the left hand side of the card then I took the three leaves and stamped randomly over the script and, without re-inking, I stamped them again. A lot of the white card base is covered but I think that, because none of the images are solid, the white shows through and gives the impression of still having quite a lot of white space - well I hope so anyway!
The second card is made with a sentiment stamp from Happiest Birthday Wishes (a hostess set) and, because Chrissie & Mandi have said the script must not just be a sentiment stamp, I have adapted it a little. The original stamp starts with the 'B' and ends with a '!' and just above the 'T' it says happy, so I masked off the 'happy' and inked the rest of the stamp with Soft Suede and placed in the centre at the bottom of the card. Using my stamp-a-ma-jig I stamped again at either side to make a script border. I then took another stamp from the same set and inked just the 'Wishing you a happy' part with a Soft Suede marker and positioned this above. The mushrooms are from the Everybunny set and were stamped in Soft Suede and Old Olive then coloured in using a blender pen.
I hope you all have a great weekend and I look forward to coming round and visiting you all - when I've got the housework and the shopping done that is!!

Monday, 5 March 2012

Gift Bag & card set

The gift bag and card I am showing you today is inspired by a present I have bought for a friend (hope she doesn't look at this before her birthday!) 
The material is coloured dragonflies, as shown on the left and, as I have a dragonfly stamp in the Nature's Nest set, I thought why not make a matching gift bag to pop my present in. I don't know about you but if anyone gives me something that is handcrafted I am always much more interested in the wrapping/box/container than I am the contents. With something handcrafted you always know that a lot of thought and effort has been put into the gift and it makes it so much more special.
Anyway enough waffle, have a look and see what you think.


The gift bag is made from the same tutorial that I used the other day for the flowery bag (scroll down for more info or see Sarah's turtorial here)
I used two sheets of Whisper White cardstock for the bag and some retired Melon Mambo ribbon (however this is now available in the Scallop Dots ribbon). I used the dragonfly stamp with Wisteria Wonder, Melon Mambo and Pumpkin Pie as these were the closest match to the fabric and the tiny flower, from the SAB set Fresh Vintage, was used just to fill in the gaps! I added a Melon Mambo gift tag from Cottage Garden.
I attached the handles differently this time by using Rhinestone Brads.

Now onto the card which, before you look, I will say I am not overly happy with - much too fussy for me, so may well be doing this again without the Melon Mambo fancy circle for the sentiment. I ummed and aarghed and decided to use it and after it was stuck I wished I hadn't!

I stamped a piece of Whisper White cardstock with the dragonfly and flower, using the same colours as before but this time stamped off to give a more subtle image. This was matted onto Wisteria Wonder cardstock and a piece of Melon Mambo ribbon was put around before layering onto a white card blank.
The sentiment, from the Hostess set Happiest Birthday Wishes was stamped in Wisteria Wonder and punched out with the Scallop Circle punch.
Then comes the bit I wish I'd left out - the sentiment was layered onto the Melon Mambo fancy circle, cut from the Perfect Pennants die and glued in place. I'm now convinced it would have looked SO much better without it!!!! Oh well you learn from your mistakes as they say - the number of mistakes I make I'm not so sure that's true :0)
Thanks for looking and for all the lovely comments - they really do mean a lot to me x
Whoops I pressed 'post' instead of 'save' so 2 posts today and probably none tomorrow!!

Friday, 17 February 2012

Sale-a-Bration Freebies!


 Something a bit different to my usual style today – fancier and more layers, but I am quite pleased with the result. I wanted to make something with the SAB sets of Everyday Enchantment DSP and the Fresh Vintage stamp set so I chose the paper that echoes the stamp and made a gift box and matching card. The box is just one I made up and is a basic square box with a lid but I cut two of the sides a bit differently to add a bit of interest. The box base is made from Pool Party cardstock with panels of DSP added and the loop is Riding Hood Red Taffeta ribbon – the actual red in the paper is Poppy Parade but, as I didn’t have this, I tried the R.H.Red and I think it matched just as well.
The card is a Naturals Ivory blank with a strip of Pool Party, a narrower strip of DSP on top and finally a strip of the Pool Party again, punched with the Scallop Dotted Ribbon punch and finished with a knot of R.H.Red Taffeta ribbon. I stamped the sentiment, from Happiest Birthday Wishes, three times onto Very Vanilla, punched out with co-ordinating punches and then layered using dimensionals. At this stage the card looked a little bare on the right-hand side so, before fixing the strip into place, I stamped the stamp (which matches the DSP) in Crumb Cake and then fixed the card & DSP strip on top slightly overlapping the stamped images.
The Fresh Vintage stamp set and the lovely Everyday Enchantment DSP are two of the choices you can get free with an order of £45, available only until 31st March – so go on, treat yourself and get some freebies while you can!

Friday, 10 February 2012

Triple Treat with Wisteria Wonder

Another quick'n'easy card for you, this time inspired by Angie Kennedy (an American SU demo), but using a different stamp and different colours. The Triple Treat Flower punch was stamped twice in Wisteria Wonder and the centre stamped in Elegant Eggplant onto Whisper White. The first image was punched out with the Fancy Flower punch, the second with the 5-Petal Flower punch and the centre with the ½" circle punch and layered up with dimensionals. A strip of Wisteria Wonder cardstock was cut at the ends, adhered to the card and the flower placed on top. The sentiment, from Happiest Birthday Wishes, was stamped in Elegant Eggplant. 
I am fortunate enough to own the punches used for this card but the image would not be too difficult to cut out by hand (maybe with the exception of the small circle which I am absolute rubbish at cutting!). The only disadvantage in this would be that it would take a little longer to make - it's so quick when you can just punch away. I love the simplicity and cleanness of this card so I think I will be making a few more in different colours, leaving the sentiment off, so that I have cards ready and waiting which would be suitable for any occasion.

Sunday, 29 January 2012

Simply Stampin' Colour Challenge


Over at Simply Stampin' this week there is a colour challenge using Not Quite Navy, Early Espresso, River Rock & Very Vanilla and this is my card. As the colours were suitable for a male card I decided to use the challenge to make a birthday card for my Dad who, as you can see, will be 90!
I don't know if there is a proper name for this style of card but if there is I don't know it so, in a nutshell, it is a piece of A4 (portrait) cut at approx 15cm then turned landscape and scored at 10.5cm to form the flap. The small scene was made by using a clear block, inked with N.Q.Navy, then stamped onto Whisper White, then repeating this with River Rock and stamping underneath the first block. I then stamped the trees from Lovely as a Tree in Early Espresso and cut down to size. This was matted and layered onto River Rock, N.Q.Navy and Very Vanilla and positioned on the flap of the N.Q.Navy card base. The piece of Very Vanilla for the rest of the card was stamped, again with the trees in Early Espresso and glued in place. The banner is River Rock stamped with 'dad' from the For My Family set, attached with a Metallic Brad, and the sentiment is one of the stamps in Happiest Birthday Wishes coloured with a marker so I could split the sentiment up and place the 90, cut with the Timeless Type Alphabet Dies, in between the words.

In my quest to make the tree scene I ended up with a few rejects but decided this one wasn't too bad to use for another card. Still using all the same colours but this one was far less time consuming - in fact it was thrown together in just a few minutes - which you can probably tell!!!  :0)
Just before I go I would like to thank the design team over at Simply Stampin' for putting me in the Top 3 again this week - thank you ladies for that and for all the lovely comments, I really appreciate it. x

Wednesday, 25 January 2012

More Colour Mixing!


I'm really going against the grain with this card in my effort to use DIFFERENT colour combos! Although this one is quite subtle it is still using a mix of colours that I would usually steer clear of. I have used a base card of Naturals Ivory with a strip of Crumb Cake DSP, from the Neutrals Paper Stack. going across the card. I punched four 1" circles in Bravo Burgundy, Old Olive, Pacific Point & Wisteria Wonder and adhered these to the back of the Lace Ribbon Border, punched from Crumb Cake cardstock. This was fixed down the side of the card and a piece of Very Vanilla, punched with Dotted Scallop Ribbon Border punch, placed alongside and the tiny dots were punched with a small circle punch. The sentiment is from Happiest Birthday Wishes and stamped in Pacific Point.
Related Posts Plugin for WordPress, Blogger...