Pages

Showing posts with label Blossom Party die. Show all posts

Tuesday, 17 September 2013

Flowery Wreath


This is a wreath I made during the summer holidays to hang in my porch and I've only just got round to showing you!
The flowers were made using the Fun Flowers and Blossom Party dies in different combinations and leaves punched from, the now retired, Blossom Petals Punch.
The colours are Elegant Eggplant, Wisteria Wonder, Perfect Plum and Certainly Celery and the wreath was finished off with a bow made from Smoky Slate Chevron Ribbon.
No masterpiece but just an example of how you can use SU products for home decorating and not just cards!!
Margaret x

Thursday, 16 May 2013

Labour of Love!


This is my 'labour of love' card that I was working on last week - called that because of the excessive amount of time it took to make!! It's an oversized card, an A3 piece of card folded to make a card which is A4, made for a work colleague who is leaving and it needed to be large so that everyone can sign it. I used Chocolate Chip for the mat with diagonal score lines across the top right and bottom left corners with Chocolate Chip butterflies stamped on the central plain section. I then used the large scallop oval die to cut Crumb Cake Cake cardstock and a smaller oval die for the Very Vanilla mat stamped with four butterflies, from the SAB set Bloomin' Marvelous, in Crunb Cake. I then punched four butterflies with the Bitty Butterfly punch in Vellum cardstock to overlay the stamped butterflies and added a Basic Pearl to each one. The flowers were made from Very Vanilla cardstock with the Boho Blossoms Punch and Blossom Party die. Leaves were punched from Certainly Celery with the Bird Builder punch. I finished the card with a computer generated sentiment cut into a banner and three Basic Pearls across the top right corner. I made a bag to put the card in which is pictured on the right.
Tomorrow I will be back to show you my card that was made for the same lady.


Friday, 22 March 2013


Do you ever have times when you don't want to write a letter but you want something a little different to a card? Well I have set myself the task of designing a set of 'let's call them notelets' for my class in April and this is just one that I've come up with so far.
It is a C6 sized tag made with Soft Suede and Very Vanilla cardstock and decorated with Pool Party flowers made with the Blossom Party die and Boho Blossoms punch. The stems from Field Flowers are stamped in Certainly Celery and the sentiment from A Word for You in Soft Suede. A hole was made in the top and some Pool Party Ruffled ribbon threaded through and tied with Pool Party Baker's Twine. The small picture shows the back of the notelet, a square of Very Vanilla cardstock with plenty of room for you to write on.

Tuesday, 19 March 2013

21st Birthday

This is a 21st birthday card I have been asked to make and is one which was inspired by the very talented Gill Prescott (see her card here). Gill not only makes beautiful cards but she also makes fantastic cakes - pop over to her blog and you can't fail to be inspired as well!
I have used Pool Party and Brushed Silver for the flowers, made with the Blossom Party die and a punch from the Itty Bitty Shapes pack.The sentiment is made up from individual stamps in the Memorable Moments set, although this is one of the more expensive SU sets I find it invaluable as you are able to make any combination of numbers (great for kids who like to be reminded of their age!) and also has an 'anniversary'  as well as the 'birthday' stamp. This was silver embossed and then cut with a die from the Labels Collection Framelits before matting onto a larger Pool Party diecut. Three loops of Pool Party ribbon (a freebie in the SAB ribbon & buttons pack) were placed onto the card before fixing the sentiment panel with dimensionals. As you probably know I like to make a matching bag for special cards so here it is


The retired sentiment was cut with an Apothecary Accents die.

Monday, 25 February 2013

No 'Thanks' to me!


Today I've got a beautiful box to show you which my sister made for my daughter - hence the 'no thanks to me' title as I can take absolutely no credit whatsoever! The box held some yummy chocolates which were probably eaten faster than it took to make the box :0)
The base (which you can't see) was made with Chocolate Chip cardstock and the lid with Chocolate Chip DSP from the Neutrals Paper Stack. A cameo of flowers and leaves were made with an Ovals Framelits, Little Leaves Sizzlits and the gorgeous Blossom Party dies in Chocolate Chip DSP, Chocolate Chip and Very Vanilla cardstock. The ribbon and sentiment are now both retired.
A lovely gift and one which, I have to say, I would appreciate the box more than the chocolates!!!
My sister has no idea that I'm posting this (in fact she doesn't even know I took the photos) and I'm sure she will be quite cross as, being a perfectionist Virgo, she is NEVER happy with anything she makes. However I cannot agree, in my opinion this is a gift that anyone would be thrilled to receive. If you would like to leave a comment they will be passed on!!!!

Saturday, 25 August 2012

3-2-1


3-2-1 yes that's the challenge at Less is More this week and this is my card - 3 Flowers, 2 Stripes and 1 Sentiment. It could also be my '6 of 6' for the card set I am making but I've already done that! The truth is that I haven't tidied up from making the set of cards I have been showing you this week and the flowers and the black border were left over so I thought I would put them to good use. All I had to do was cut a couple of extra daisies (from the Blossom Party die) and a strip of Crumb Cake. It's all very self-explanatory I think, as well as very simple) - cut and put together 3 daisies, cut two borders (one of mine is from the Adorning Accents Edgelits dies), assemble the card and stamp a sentiment!! My card base is Naturals Ivory and the sentiment is from Petite Pairs.

Sunday, 29 July 2012


Just a very quick post as it's been over a week since my last one. My Dad is still in hospital so not much time for crafting and, what little time I have had, I've been frantically making 60 Mini Milk Carton Favors for a wedding next Saturday! Anyway today's card is one which I made a couple of weeks ago for a retirement using flowers made with the Blossom Party die which was available in the Spring Mini (let's hope it reappears in the main catalogue in October). The small flowers are punched with an Itty Bitty Punch and the leaves are made with the Little Leaves Sizzlits die. I used Rich Razzleberry for the main colour with a mat of Whisper White on top, the side of this was cut with one of the Adorning Accents Edgelits die and embossed with an Adorning Accents Textured Impressions Embossing Folder, both available in the Summer Mini until the end of August. The card was finished off with a sentiment and a few Basic Pearls.
Thank you for still visiting and I will try to post again as soon as possible :0)

Sunday, 27 May 2012

Gift Bag


A while ago I showed you a card I made for a work colleagues 60th birthday and I have made this little matching gift bag to hold a small box of continental chocolates.
The bag is made with Whisper White cardstock as are the flowers, with a touch of Rose Red to add a little bit of colour (and to match the card!). The large flowers are made with the Blossom Party die, the smaller ones are punched from the Boho Blossoms punch and the leaves are cut with the Little Leaves die. I added a sentiment from Oval All, punched with the Oval Punch and matted onto a Rose Red Scallop Oval. The handles are made with Rose Red Seam Binding.
I hope you are making the most of this hot sunshine although, I have to say, I would have liked a bit of Spring in between Winter and Summer. Last week I was still wearing a winter coat and this week I'm too hot in a t-shirt!!

Monday, 7 May 2012

Unashamedly CASE'd!


Today's card is one which I CASE'd from Lynney, a fellow SU team member (you can see her card here). As soon as I saw it I knew I was going to have to make one as it is so clean and simple but at the same time beautiful, so thanks Lynney for the inspiration.
I have made mine for a work colleague who will be 60 very soon and so have added a bit to the card. I started with a Rose Red card base and then added the Whisper White layer which had been partially embossed with the Stripes Embossing Folder. The flowers are cut with the Blossom Party die (this was in the Spring Mini so is no longer available but hopefully it will make it into the main catalogue in October) and I slightly curled the petals before glueing two together and adding to the card. The centres are punched with the 1/2 inch punch and rounded, I do this by placing the circle on the pricking mat and going round in a circular motion with the end of my pricking tool, these were then placed in the centre of the flowers using a dimensional. The sentiment is from the hostess set 'Happiest Birthday Wishes'. As it is a special birthday I cut the numbers from Whisper White using the Timeless Type Junior Alphabet die and added a tag saying 'today' punched with the Jewelry Tag Punch, finished with a Basic Pearl.
Have a lovely Bank Holiday and, now it's out of the way, let's hope we start to see some warmer weather :0)

Thursday, 3 May 2012

Celebrating 80


Here is another card which I was asked to make for a very special 80th birthday. I used the Blossom Party die which, unfortunately, was only available in the Spring Mini but let's hope it makes it's way into the new main catalogue in October. This is a lovely die and one which I probably use more than any other as you can make so many different flowers using different layer combinations. The DSP is from the brand new Twitterpated available in the Summer Mini, the leaves are cut with the Little Leaves Sizzlits die (in Old Olive & Certainly Celery) and the tiny flowers are punched with the Boho Blossoms punch. 'Mum' is from For my Family, 'Happy' is a retired stamp and the 'th and birthday' are part of a stamp from Perfect Punches inked with an Old Olive marker. I cut the 80 from the Timeless Type Junior Alphabet dies in Old Olive and some Basic Pearls were added to finish the card off. The A5 base card is Old Olive matted with Whisper White. I made a bag to put the card in, decorated with leaves, some tiny flowers and the sentiments with handles made from Old Olive satin ribbon.

Saturday, 14 April 2012

Simply Stampin' Sketch - again


Whilst having a grand clear up in my craft room I came across the two pieces of DSP that I messed up when making my first card for the Simply Stampin' Sketch challenge this morning, so I decided I would have another go and use the reverse spotty side. I matted the panels onto Basic Gray cardstock and positioned them onto a white card blank. I cut two flowers from the Blossom Party die in Pink Pirouette and, after curling them slightly, layered one on top of the other and glued them onto the central panel. The other two flowers are punched with the Boho Blossoms punch - all the flowers have DSP centres cut with a circle punch and the leaves are punched from Old Olive with the Bird Builder punch. The banner is a strip of Whisper White and Old Olive cardstock, cut at the end, with the retired sentiment stamped in Old Olive and three Basic Pearls added.

Wednesday, 28 March 2012

Mother of Pearl

I had one last piece of the Mother of Pearl / Perfect Plum cardstock which I made last week so thought I would put it to good use and make another card. A simple card made by matting a rectangle of the treated cardstock onto a slightly larger piece of Perfect Plum cardstock with Perfect Plum Taffeta ribbon tied around. The front of a white card blank was covered with Perfect Plum DSP, from the Subtles Paper Stack, leaving a narrow border of white around it. The Mother of Pearl panel was fixed onto this at an angle and the flower, which was made using the Blossom Party die, glued to the panel. The remaining scrap of cardstock was stamped in Elegant Eggplant, with a stamp from the Hostess set Happiest Birthday Wishes, and punched out using the Scallop Circle punch.
When I was making the Mother of Pearl cardstock last week I did a whole A4 sheet with the Frost White Shimmer Paint as this needs to dry before sponging the coloured ink on. I only used half of the sheet when colouring with Perfect Plum so I was left with the other half ready to colour which I did today so pop back tomorrow if you'd like to see what I did with it.

Saturday, 17 March 2012

Faux Mother of Pearl Mashed Up!


The challenge at the Friday Mashup is to make a project using the sketch (above) or the faux mother-of-pearl technique or 'mash it up' and use both. I decided to use both and came up with the card above.
I began by using the faux mother-of-pearl technique on a piece of Whisper White cardstock, using Wisteria Wonder and Pretty in Pink for the sponging. This was then used for the flower, cut with the Blossom Party die. the tiny flowers from the Itty Bitty Shapes Punch set and the sentiment tag punched with the Modern Label punch. For the base I used a panel of Elegant Eggplant DSP with a piece of Whisper White matted on top which had been sponged round the edges with Wisteria Wonder and then a knot of the Scallop Dots ribbon was placed over the join (I tied the knot so the ribbon was on the plain side and not the dotty side) before fixing to a plain white card blank. The flower was mounted on a circle of Elegant Eggplant, cut with the Circles die and run through the Perfect Polka Dots Embossing Folder, and then positioned onto the card. It doesn't show up very well on the photo but the Faux Mother of Pearl is a lovely technique and gives a luxurious look to a piece of plain card - give it a go and see for yourself!
The weather here is awful today, rain and lots of it, so wherever you are and whatever you are doing have a lovely day and I'll be back soon. x

Thursday, 1 March 2012

Bag of Blossoms


I was on a little journey blog hopping the hopping day when I came across a fabulous tutorial to make this bag, done by Sarah at Little Snippets. You can view the tutorial here and also some of Sarah's stunning bags but don't just stop there, have a look around at her lovely projects!
My bag is nowhere near as gorgeous as Sarah's but I hope I have done it justice, after all it is my first attempt and probably one of many!!
I made up the bag using 2 sheets of Very Vanilla and decorated it with 3D flowers made with the Blossom Party die and Boho Blossoms punch. The flowers were made in So Saffron and Very Vanilla with a Basic Pearl for the centres and the leaves were cut with the Little Leaves Sizzlits die using Very Vanilla and the ribbon handles are So Saffron Taffeta.
The possibilities for making and decorating these bags are endless and I am itching to make another completely different one so watch this space :0)
Thanks for sharing Sarah - you're a star x

Thursday, 23 February 2012

Decorated Tin


This is a little covered tin with a matching gift card, made in Perfect Plum and Elegant Eggplant. I covered the top of the tin with DSP from the Paper Stack and made the 3D flower with the Blossom Party die in Perfect Plum and Elegant Eggplant. I put a River Rock leaf spray behind the flower, cut with the Little Leaves Sizzlits die.The card is simply made with a strip of matching DSP and a single fower from the Blossom Party die, with a sentiment stamped in Elegant Eggplant. I transformed my tin into a mini scrapbook with photos of my grandchildren but it would make a nice container if you were giving money as a gift and you could decorate the inside of the tin as well if you wanted to. 
The tin that I used was a new one bought specifically for the job but you can transform a used container (there are several tins around that contain sweets) with a bit of DSP and maybe some ribbon so, before you confine things to the bin, take a look at them and it's amazing what you can do!

Saturday, 18 February 2012

COLOUR COMBO to DIE for!


Back again with some cards I am entering for two challenges - Less is More which this week is Die Cuts or Punches, and Simply Stampin' which is a colour challenge using Melon Mambo, Pretty in Pink, Wisteria Wonder and Whisper White. I don't feel like I'm cheating as I've made 4 cards in all (scroll down for the 4th one) so that's an average of 2 per challenge!
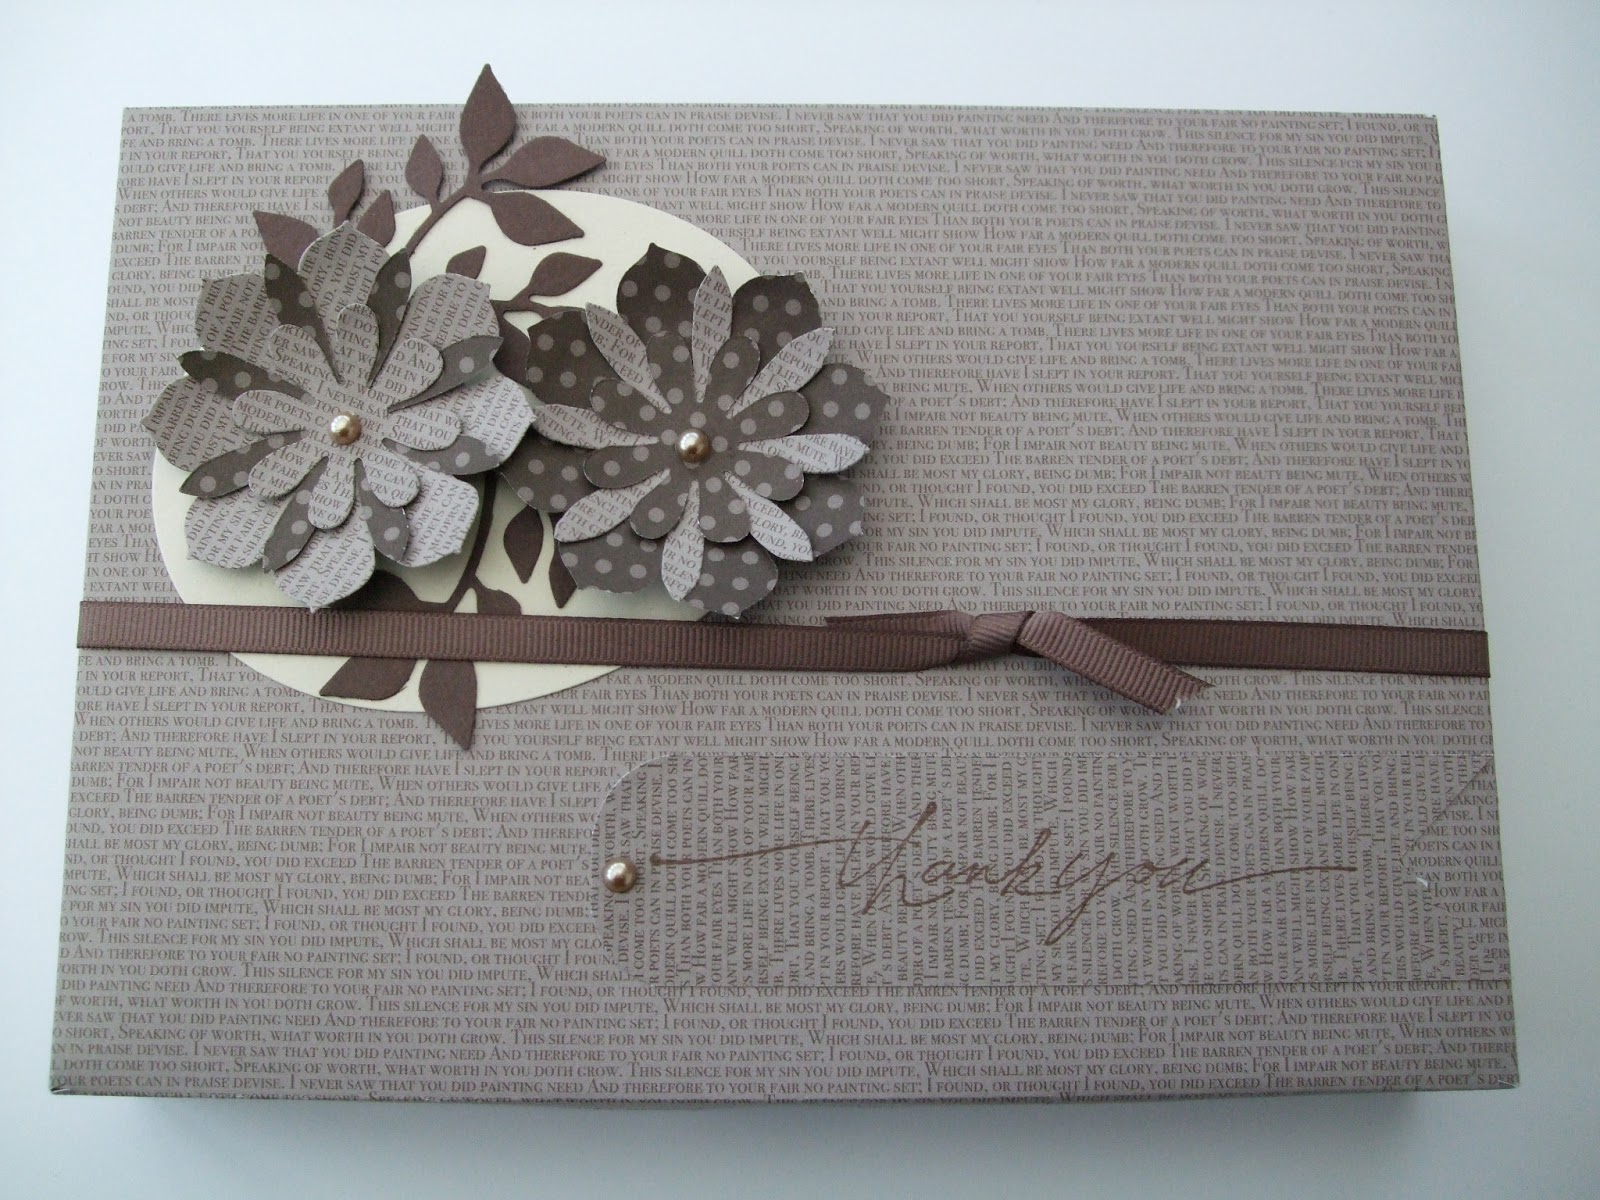
I needed to make some thank you cards so I'm killing 2 birds with one stone, so to speak, and here they are. Using the aforementioned colours but swapped around to make three different cards,along with the Blossom Party die, Beautiful Wings Embosslits die and the border stamp from the SAB set, Fresh Vintage, and various thank you sentiments. After having cut the butterflies I was left with some over so made another card to use them up which you can see below.

For this I used the large foliage stamp from Just Believe, inked with Wisteria Wonder and, as I only wanted a faint background, I stamped off before stamping onto the card. I added the butterflies which were supposed to be 'scattered' but, after I had glued them, it would appear they are rather more regimented than I intended! The sentiment was supposed to be stamped directly onto the card but I managed to also ink the edge of my stamp leaving a nasty line underneath so I hastily stamped again onto a piece of cardstock and punched out with the Modern Label Punch and managed to cover up my mistake (oh, if only everything were that easy!). The butterflies, as on the ones above, were adorned with the tiniest of Basic Pearls to finish them off.
Again can I take this opportunity to thank Chrissie & Mandi and all the DT at Simply Stampin' for their brilliant challenges they really do inspire me, as do all the other entries. Also many thanks to everyone who leaves such kind comments and not forgetting a big hello to my new blog followers - I hope you enjoy visiting.
Have a lovely weekend, it's cold and damp here at the moment but they say it's going to get milder again next week - roll on spring! x

Friday, 17 February 2012

I'm not Old, I'm Vintage


Oh dear you can tell I'm off work - 2 posts in 1 day! Never mind back to the grindstone on Monday so back to normal then (well as normal as normal gets).
Whilst drinking coffee and blog hopping this afternoon I came across a challenge site called 'Friday Mashup' which each week sets a combination of two challenges. You can either mix the two or just use one and this week is the sketch above and, to 'mash it up', also go Vintage or Shabby Chic. As I am definitely much more Vintage than Shabby Chic (me that is, not my style of creating) I chose to go with that. I started by embossing a piece of Crumb Cake cardstock with the rectangle from the Designer Frames Embossing set and cut a rectangle of Crumb Cake DSP to go in the centre onto which I stamped the sentiment in Chocolate Chip. I inked all around the edge of the cardstock with Crumb Cake ink before fixing to a card blank made from Naturals Ivory cardstock which I also inked around. The two 'photo corners' were made with my square punches from Chocolate chip cardstock and glued in place. I cut the flowers from my new Blossom Party die using more DSP to match the central panel and used the reverse pattern for the centre circle. The petals were curled a little before fixing in place. 
Do come back tomorrow when, despite still having a hundred and one things I need to do before going back to work, I'm sure I will find time for a LIM card!

Monday, 13 February 2012

Blossom Party


The card I have for you today is still 'simple' but just a little more time consuming. Pretty much all the work is done for you with a die cutting machine and it's just up to you to do the designing! I have been inspired by several crafters in the use of this die (particularly from America and Australia where they have had the die for longer than the UK) so cannot attribute credit to any one in particular but a quick Google search will also inspire you I am sure.
I have used the brand new Blossom Party die available in the Spring Mini and it is fast becoming my favourite! The die has 5 cuts on it and the variety of blossoms/flowers you can make with different combinations are endless.
I decided to use Pink Pirouette for the simple reason it happened to be on my desk, unopened waiting to be put away, and teamed it with Certainly Celery for the leaves which I cut out with the Little Leaves Sizzlits die. I used 4 different cuts on the die to make the flowers and, for this card, I layered and curled them to give some dimension but if you wanted a flatter card to post then you can simply miss out the curling. 
The Blossom Party die is available to buy for £16.50 and the Little Leaves die is £4.95 so if you have a die cutting machine then, for a little over £20, I would seriously recommend buying these. I'm sure you will get LOTS of use out of them - I know I will!
If you would like to order anything from the current Stampin'Up! catalogues then I would be happy to help - and don't forget if you spend £45 then you can choose an item from the SAB catalogue completely free (links to the current catalogues are on my side bar so you can browse at leisure)
Related Posts Plugin for WordPress, Blogger...