Pages

Showing posts with label Petite Pairs. Show all posts

Saturday, 4 January 2014

LIM - Winter Blues


Well it's back to the normal Saturday routine and the LIM challenge which, this week, is called Winter Blues. The ladies want to see cards made with shades of blue so here is my attempt.
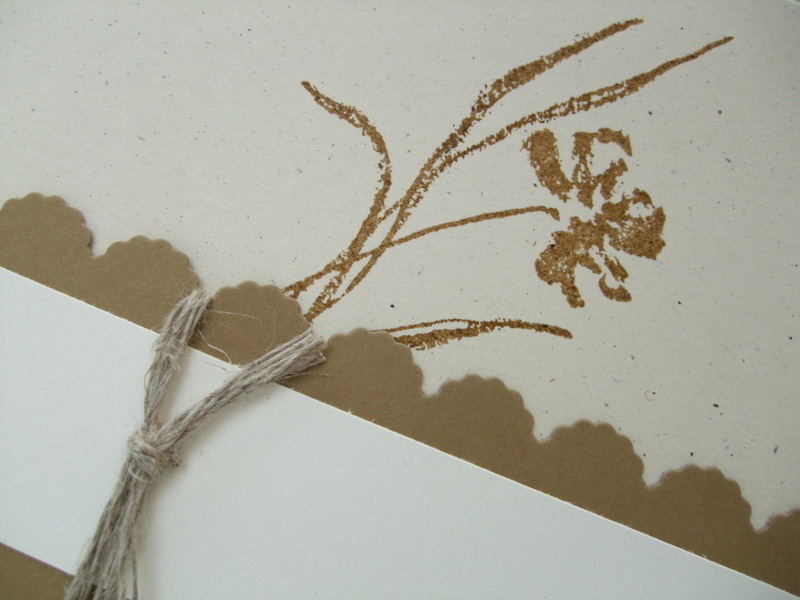
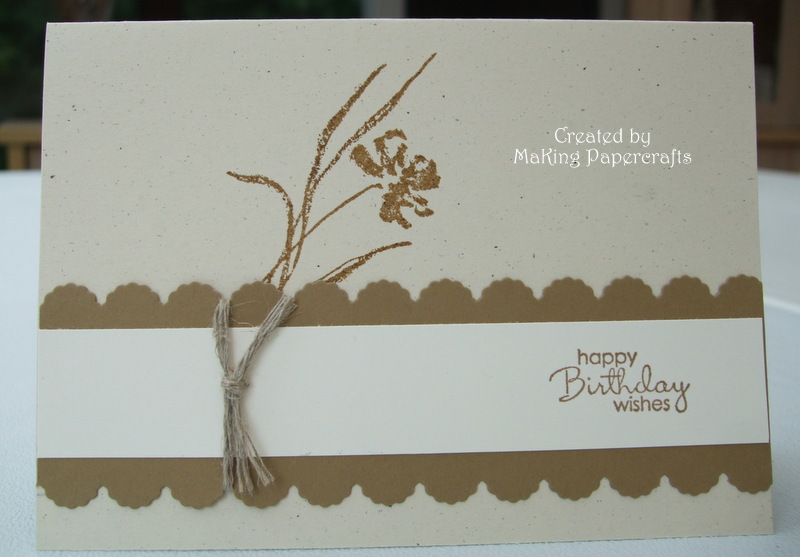
I used my aqua painter along with Soft Sky, Marina Mist and Night of Navy to colour a background before stamping the image from Love & Sympathy over the top in Night of Navy. A sentiment from Petite Pairs was stamped, again in Night of Navy, and the card was finished off with three of the tiniest Basic Pearls.

The weather here is atrocious again this morning, very wet and windy, but thankfully I don't live anywhere near a coastline. How awful for those poor people to have been flooded at Christmas and then again this week - I can't begin to imagine how devastating it must be.
Until next time, stay safe

Margaret x


Monday, 25 November 2013

Owl Santa


Here I am back again with yet another entry for the LIM challenge - A Christmas Bird. This time I have used the ever faithful Owl Builder and Bird Builder punches to make a Santa Owl. he is made from Crumb Cake, Real Red and Basic Black cardstock with a teeny piece of Silver Glimmer Paper. His hat was stamped from Embellished Events, cut out with paper snips and a bobble punched with one of the Itty Bitty Shapes Punch Pack.
For the background I took a square of Basic Black cardstock and swiped the Whisper White inkpad across the bottom to make the 'snow' and some Dazzling Diamonds for the sparkle. As it is meant to be a night scene I used just the tree bauble stamp from Warmth & Wonder to represent lights on a Christmas tree and the twinkly stars (again a stamp from Warmth & Wonder) are stamped with the Silver Metallic Encore pad. The finished panel was then matted onto a Basic Black card blank with a sentiment from Petite Pairs, stamped in silver, added to the bottom of the card.
Thanks for stopping by
Margaret x

Saturday, 23 November 2013

Christmas Robin


As soon as I saw the LIM challenge this morning, which is to make a Christmas card using a bird, I knew exactly what I wanted to do. This little robin, made with the Bird Builder punch, is something I have done many times before but I do love him. Really simple to make - just punch out the bird using Crumb Cake cardstock and ink him however you wish using sponge daubers. My little bird is sitting on a Pear Pizzazz wreath, made from the Stippled Blossoms leaf stamp, and the 'baubles' are blobs of Dazzling Details. A sentiment from Petite Pairs, stamped in Real Red, and a bow of Linen Thread were added before matting onto a panel of Pear Pizzazz cardstock and then onto a Crumb Cake card blank.
Have a great weekend and, hopefully, I will be back tomorrow with a super easy 'Christmas bird'
Margaret x


Sunday, 3 November 2013

3D Simples Sunday


For today's Simples Sunday post I thought I would share a 3D project with you, which I saw on YouTube by a lady named Cheryl Fladager, and uses the brand new Envelope Punch Board (now available to order at £17.95).You can see Cheryl's video here.
I originally used the idea to make Halloween Treat bags for my Grandchildren's party (see below) but, as Halloween has now gone, I made some more Christmas themed ones to show you today. They are so easy to make and use just a 5" square piece of DSP or cardstock so perfect for using up all those oddments. They can be used to hold chocolate bars or, if you are giving money as a gift, this is a nice way to give it.
For the pouches above I have used Winter Frost Speciality DSP along with a Festive Flurry Framelit and a sentiment from Petite Pairs but you can use anything really and decorate with whatever supplies you have. The photos below show the Halloween version along with a Santa suit money holder.


Thanks for stopping by and enjoy the rest of your weekend
Margaret x


Saturday, 29 June 2013

Less is More (and Simples Sunday - a day early!)


Less is More has a guest designer Hannelie (or Desert Diva) this week and, to acknowledge her blog name, the challenge is SAND. It doesn't have to be the colour, it can be anything related to sand but as you can see I have gone for the colour element!
I've kept the design simple for two reasons - one being I didn't have a lot of time this morning and secondly because I don't have a Simples Sunday card this week so this one can be doubled up as Less is More & Simples Saturday!!
If you're wondering about the colour I've used it's Baked Brown Sugar, a brand new colour from SU which will be available on Tuesday with the new catalogue launch. I took a strip of cardstock and diecut both sides with an Adorning Accents Edgelits die, then matted a piece of Very Vanilla on top before tying round some Baker's Twine. I stamped the image from Love & Sympathy in Baked Brown Sugar onto a Neutrals Ivory card blank before matting the panel on top. To finish the card a sentiment, from Petite Pairs and again in Baked Brown Sugar, was stamped on the Very Vanilla.
I have a special 'afternoon tea' to go to tomorrow (provided by my lovely sister of course!) to celebrate my Mum's 92nd birthday. She will have her two daughters, three grandchildren and four great-grandchildren there and I have a feeling it could be a bit hectic :0)
Whatever you're doing have a great weekend and I'll be back soon x

Wednesday, 5 June 2013

A Challenge

My upline, Michelle, has set up a new forum for her team - The Pinkies - and a challenge has been set using a sketch.
I decided I'd have a go and ended up making two cards, for the simple reason that I wasn't very happy with the first one! (below)
The one on the left is using an In Colour, Gumball Green, along with Naturals White. The DSP is from the, soon to be retiring, DSP stack, the flower is made with the Floral Fusion die and the leaves punched with the Blossom Builder punch which is also retiring.
The card on the right is the one I wasn't too happy with as it looks a bit out of proportion to me, but I thought I would show you anyway.
The sentiment, Beautiful Birthday, is another stamp that will be retiring soon and this card is made using Summer Starfruit. The flower and leaves were made with the same die and punch as the card above and the ovals cut with the Ovals Collections Framelits. The scallop around the oval is made with a strip of card punched with the Scallop Borders punch.

Monday, 3 June 2013

Get Well Owl


All the credit for the idea of this cute owl tissue holder has to go to Jo Dumbleton who designed this a while ago. You can see Jo's creation here.
For my holder I used Wild Wasabi cardstock and DSP which matched the packaging on the tissues. The nurse's cape was punched with the Bird Builder punch. The 'for you' is a retired stamp punched with the Jewelry Tag punch which is also retiring at the end of this month - this is one punch I will not be getting rid of, retired or not!! The other sentiment is one from the Petite Pairs set.
A short,sweet and very late post - it is my first day back at work and I'm ready for bed!!!
Back soon x


Sunday, 3 March 2013

Simples Sunday


I have two cards today for 'Simples Sunday' both on a get well theme although they could both be used for other things as the sentiment is 'feel better' rather than get well!!
The first one is using the apple from Fruit & Flowers, inked with Real Red and Old Olive markers with a small punched heart and rhinestone in the centre. I used the Real Red marker to colour part of sentiment saying 'to make it' (you can see the full stamp below) and the Feel Better is from Sassy Salutations. A tag made with Tiny Tags and the Jewelry Tag punch was added to the stalk of the apple.
'Simples'


My second card uses two sentiments from Petite Pairs and a 'kiss' made from Real Red cardstock, cut with the Typeset Alphabet Bigz die and then run through the Perfect Polka Dots Embossing folder. Some Basic Rhinestones finished the card with a bit of bling.
'REALLY Simples' !!!

Saturday, 23 February 2013

Paper Piercing


When I saw this week's challenge at Less is More was Paper Piercing it gave me the perfect excuse to play with the Essentials Paper Piercing pack which I got free in the Sale-a-Bration promotion. When I read the challenge I knew exactly what I wanted to do but would the sentiment fit? The answer - yes perfectly!! I started by paper piercing a piece of Whisper White cardstock and then, using my stamp-a-ma-jig, I stamped the 'Mr&Mrs' stamp and the congratulations (from Love & Laughter) in Versamark and silver embossed them. This is where something simple became complicated - I had 3 attempts at this before getting one I was happy with because, for some unknown reason, I kept smudging it!!! Anyway finally I matted the panel onto Brushed Silver cardstock and then onto a card blank before adding two tiny flowers with a Basic Rhinestone centre. A CAS card which could be used for either a wedding or Anniversary card. Not happy with stopping there I made another, completely different, card which thankfully worked first time.

I used the heart template to paper pierce two intertwining hearts and added two sentiments from Petite Pairs in Rich Razzleberry, this was matted onto Rich Razzleberry cardstock then on to one side of a card blank. Some small hearts, from the Owl Builder punch, were added down the side.

Well it's trying VERY hard to snow here at the moment and it's bitterly cold so, whatever you are doing this weekend, keep warm and have a good one x


Sunday, 17 February 2013

Simples Sunday x 2

Can you believe it's Sunday again -where has that week gone??
Well I have 2 cards to show you this week using graduated colours, not CASE'd but inspired by several talented demo's out there in blogland.

Both using Sale-a-Bration freebies - the Bloomin' Marvelous & Pretty Petites stamp sets,the Ribbon & Button pack (although I didn't use any buttons!!) and the Petite Curly Label punch.

For the top card I used the butterfly stamp with Pool Party, Tempting Turquoise and Island Indigo and Basic Rhinestones. The sentiment is from Petite Pairs and if you would like to know how the 'label' was made see at the end of the post.

The bottom card uses the flower and leaf stamps with So Saffron, Coral Calypso and Cajun Craze.

For both cards I inked the stamp in the lightest colour first, stamped then stamped again for an even lighter colour then proceeded stamping the other two colours. The Certainly Celery leaves on the bottom card were stamped off first as I only wanted a very light image.
Now back to that label. I stamped the sentiment onto Whisper White and punched out with the Decorative Label punch. This was then inserted back into the punch and cut again. The Island Indigo was done in the same way but using the punch the other way round. Very difficult to describe in words but I hope you can see what I mean from the photos below.


Well that seemed to be a very long post today and I'm sure it took me longer to write this than to actually make both cards!! Simple to make but, it would appear, not so simple to explain!!!
Enjoy the rest of the weekend and come back soon x


Sunday, 13 January 2013

With Love


Hello on this very cold and frosty morning (no I'm not going to start singing about mulberry bushes!) and as we are fast approaching February I thought I would show you a little 'not too slushy' Valentine's card. I started with a 10cm square card blank along with a piece of Real Red and Whisper White cardstock. Before adhering the Whisper White to the Real Red it was embossed towards the bottom with the hearts folder from the Adorning Accents Edgelits set. A large heart was diecut using the Scalloped Heart of Hearts Embosslits folder and glued in place before adding a Real Red heart, punched with one of the punches in the Itty Bitty Shapes set, and a Basic Rhinestone added to the centre. I don't have any current Valentine's sentiments but I thought this one from Perfect Pairs made the card say a lot without saying too much - if you get my drift!! Now onto the ribbon. At Christmas I was given a shop bought card from a friend and it had a ribbon fixed to it just like this and I loved it. Sometimes on a card (particularly one like this) it needs a little something extra but there's not really room to add a ribbon, well this solves the problem. Punch a little hole towards the top of the card, take a piece of ribbon and fold in half, poke the loop through the hole (from the back to the front) bring over the 2 tails and thread through the loop. It does take a bit of careful pulling to get it right but gives a lovely result I think. The panel was then positioned onto the card blank and job done :0) Thankfully, after what didn't turn out to be a very good year for our family, things seem a lot more settled and I am gradually getting back into the swing of crafting a bit more - to the detriment of the housework I have to say!! So hopefully in time I will get back to blogging on a more regular basis. A big thank you to all who have left such lovely comments and I am sorry I have not had time to return the favour but, one step at a tme as they say. Bye for now x

Sunday, 2 September 2012

Brown & Pink

It's a colour challenge of Brown & Pink this week at Less is More and this is the card I've made. I punched one edge of a piece of Whisper White cardstock with the Eyelet Border punch before matting onto a slightly larger piece of Chocolate Chip. Before fixing to my card blank I tied some Pink Pirouette Taffeta Ribbon round and finished with a bow. The central stamp is from Everything Eleanor stamped in Crumb Cake with a sentiment from Petite Pairs stamped in Chocolate Chip. I made some flowers with Pink Pirouette and Chocolate Chip cardstock, punched with Boho Blossoms and Itty Bitty punches, with a basic Pearl for the centres and the leaves are from the Bird Builder punch.
I'm really not a fan of pink but, if I have to use it, then putting it with brown is ok with me :0)

Saturday, 25 August 2012

3-2-1


3-2-1 yes that's the challenge at Less is More this week and this is my card - 3 Flowers, 2 Stripes and 1 Sentiment. It could also be my '6 of 6' for the card set I am making but I've already done that! The truth is that I haven't tidied up from making the set of cards I have been showing you this week and the flowers and the black border were left over so I thought I would put them to good use. All I had to do was cut a couple of extra daisies (from the Blossom Party die) and a strip of Crumb Cake. It's all very self-explanatory I think, as well as very simple) - cut and put together 3 daisies, cut two borders (one of mine is from the Adorning Accents Edgelits dies), assemble the card and stamp a sentiment!! My card base is Naturals Ivory and the sentiment is from Petite Pairs.

Thursday, 9 August 2012

'That' Stamp Set Again!


I just love the Reason to Smile stamp set - can you tell?? This time I've used it with the En Francais background stamp which I stamped in Early Espresso onto a square of Whisper White. The outline flower & stem stamp was stamped in Versamark and then heat embossed using white embossing powder before sponging all over the panel with Wisteria Wonder. A quick 'polish' on the embossed flowers was all it needed to remove any excess ink and then I layered the panel onto Wisteria Wonder cardstock, wrapped a piece of Wisteria Wonder Ruffled Ribbon across, matted onto a card blank and added a sentiment from Petite Pairs, again heat embossed in white and punched with the small oval punch.
Thank you to all who have sent good wishes to my Dad, he is still in hospital and it looks like it's going to be a long haul so will post as and when I can (and thanks for sticking with me!)

Friday, 13 April 2012

Singing the praises of .........


......the Stamp-a-ma-Jig and Stampin'Write Markers!!

What is she going on about you may be saying, well without these two things I would never have been able to  make this card (or certainly not without a lot of difficulty and a fair few rejects I would guess!)
I have had the Fruit & Flowers stamp set since the launch of the Spring Mini (which I would remind you finishes at the end of this month) and in all honesty I haven't really used it. However I had a sudden flash of inspiration and thought 'fruit & flowers' are things you often give to someone who's poorly, so a get well card seemed to be in order!
This is where the jig and markers come in - I started by colouring the fruit stamps with a Real Red and Old Olive marker and stamped onto Whisper White, then punched out with a circle punch and matted onto a larger circle of Old Olive. These were placed onto a piece of Whisper White, which had been matted onto a very slightly larger piece of Real Red, so I could see where to stamp the first bit of my sentiment.  Using the markers and jig, I used words from sentiments in the Petite Pairs set but re-arranged them to say what I wanted. After glueing the fruit circles into position I stamped the '&' from For My Family and 'to make it better' which is again from Petite Pairs - the 'get well soon', I think is from a retired set and was punched with the Word Window punch. The tiny flowers are punched from Itty Bitty Punch Shapes and the centres punched with the 2mm handheld punch.
When I first became acquainted with SU I thought 'I have stamp pads, why would I need markers?' and now I know. Whilst a lot of stamps can be masked with post-it notes it would be practically impossible to use different colours on a stamp without the markers so, if you think you can do without them, take it from me - YOU CAN'T! Several markers can now be bought individually at a very reasonable £2.95 so why not treat yourself to a few basic colours and I promise you that you'll soon want more :0)
I have noticed that when crafters are asked to be guest designers they are often asked 'what couldn't you do without?' - well I hope I'm never asked that question because it would be much easier to tell them what I could do without.
Waffling and inspiration finished I will get back to what I was doing before the making of this card took over!!

Thursday, 12 April 2012

Welcome Baby!


Yes I finally got away from the Punch Art cards (although I have still been case-ing them!) and have a baby card for you today. I used the baby image from All in the Family and the sentiment from Petite Pairs, all stamped in Basful Blue and punched with the small Square Punch. These were matted onto Whisper White which had been run through the Square Lattice Embossing folder and punched with the Scallop Square punch. A strip of Bashful Blue cardstock was cut to fit and the bottom was shaped with the Square Punch then the Scallop Squares were positioned onto this, leaving room to tie round some Bakers Twine on which I had added stripes with a Bashful Blue marker.

Saturday, 10 March 2012

Script Challenge


I have two cards today for the Less is More challenge, which this week is 'Script'. The card on the left is using French Foliage and En Francais with a sentiment from Petite Pairs and is all stamped in Old Olive. I began by stamping off the En Francais stamp before stamping the image down the left hand side of the card then I took the three leaves and stamped randomly over the script and, without re-inking, I stamped them again. A lot of the white card base is covered but I think that, because none of the images are solid, the white shows through and gives the impression of still having quite a lot of white space - well I hope so anyway!
The second card is made with a sentiment stamp from Happiest Birthday Wishes (a hostess set) and, because Chrissie & Mandi have said the script must not just be a sentiment stamp, I have adapted it a little. The original stamp starts with the 'B' and ends with a '!' and just above the 'T' it says happy, so I masked off the 'happy' and inked the rest of the stamp with Soft Suede and placed in the centre at the bottom of the card. Using my stamp-a-ma-jig I stamped again at either side to make a script border. I then took another stamp from the same set and inked just the 'Wishing you a happy' part with a Soft Suede marker and positioned this above. The mushrooms are from the Everybunny set and were stamped in Soft Suede and Old Olive then coloured in using a blender pen.
I hope you all have a great weekend and I look forward to coming round and visiting you all - when I've got the housework and the shopping done that is!!

Saturday, 21 January 2012

Two Challenges in One!


I'm rolling two challenges into one today as my internet connection is SO rubbish at the moment I thought I would very likely have problems posting!
The LIM challenge this week is 'Cut it Out' where the requirement is some kind of aperture and the Simply Stampin' challenge is a sketch using six squares and a sentiment.
I started by making a 'widow frame' in a piece of Chocolate Chip using my large square punch and then cut a piece of Whisper White cardstock the same size. I stamped the flower spray from Hopeful Thoughts in Old Olive and then added Wisteria Wonder flowers punched with one of the Itty Bitty Punch Shapes set. I added some tiny Basic Pearls to the centres and then stamped the sentiment from Petite Pairs in Old Olive. The Whisper White panel was then glued to a plain white card blank and the window frame positioned on top using dimensionals.
I will apologise now for the probable lack of commenting this week but I have lost the connection no less than 6 times while attempting to do this post - SO FRUSTRATING!!

Friday, 16 December 2011

More Matching Sets!


Some more matching sets I have made for some friends at work. We only buy each other small gifts but I think even the smallest gift can be made to look lovely by it's packaging. Here I have used a selection of the Mocha Morning Speciality DSP along with Basic Black, Basic Gray, Soft Suede, Very Vanilla and Crumb Cake cardstock and ribbon. The hexagonal box is made with the Mini Milk Carton die and I used the square punches for the decorative side panels - it holds a pot of 'Body Souffle' (sounds good enough to eat doesn't it?). The small box is yet more of the single chocolate boxes and the side DSP panels are punched with the smaller of the square punches and the top with the Scallop Square punch. I made a very simple matching card to complete the set, with the sentiment from Petite Pairs either silver or gold embossed. All finished off with either Basic Pearls or Basic Rhinestones.
I've had a very busy day crafting trying to finish all the things I needed to do for the last day of term tomorrow. Every year I say I will start these things in plenty of time - why don't I ever do it???
I'm really hoping we don't wake up to the snow that's forecast for tomorrow - so fingers crossed :0)

Thursday, 15 December 2011


Some more cards and chocolate boxes on the same theme as the last post, again using the Holly Berry Bouquet Speciality DSP but this time the foiled papers and Very Vanilla card bases. The sentiment is from Petite Pairs and punched with the Oval punch, layered onto a Scallop Oval and then onto a Large Oval (or Extra Large as it's called!). The sentiment on the box is punched with the Jewelry Tag punch and the flowers are made with the Boho Blossoms punch.
It is always very difficult to guage the size of things in photos when you have nothing to compare them with but, to give you an idea, the boxes hold a single Ferrero Rocher and are perfect for that small gift to maybe show your appreciation to someone.
Back soon x
Related Posts Plugin for WordPress, Blogger...