Pages

Showing posts with label Boho Blossoms Punch. Show all posts

Tuesday, 5 November 2013

Envelope Punch Board Crackers


Today's project shows you that the Envelope Punch Board is not just for envelopes! A fellow demo and Pinkies team member, Caroline Hallett, has done a fabulous video showing you how to make all three sizes of these lovely crackers which you can see here. Caroline makes some lovely items so, while you're visiting, take time to look around the rest of her blog for some great inspiration.
I made all three of my crackers with Whisper White cardstock, tied with Whisper White Grosgrain ribbon with toppers made from various flower punches, inked around the edges with Silver Encore Metallic ink and finished with a circle of Silver Glimmer Paper. The leaves were punched with the now retired Build a Blossom punch.
When you watch Caroline's video she suggests trying the Mosaic Punch instead of the Envelope Punch Board so I tried this on the smallest cracker and it worked brilliantly. Thanks for the tip, the inspiration and the measurements Caroline!
I will be back tomorrow to show you October's card I received from Alison (Card Swap Group).
Margaret x


Friday, 2 August 2013

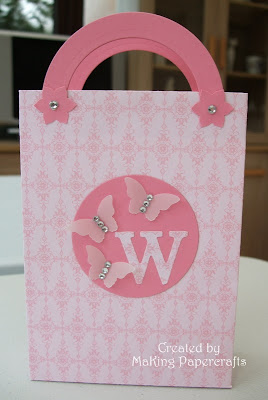
A Girly Bag!


I'm sorry I've been AWOL this week but the time has just flown by. What with prepping for my Craft Day next week, spending some time with my grandchildren and a bit of socialising thrown in, I haven't got round to blogging! Anyway just a very quick post from me today to show you a 'well done' bag I have made to mark a big milestone in my youngest grandaughter's life - the dummy has been thrown away!! So this bag will have come from the 'dummy fairy' :0)
I have used the retired Pretty in Pink DSP and cardstock for the bag, the initial from the (also retired) Timeless Type Junior Alphabet die, Bitty Butterfly punched vellum butterflies, the Boho Blossoms punch and, for the handles and the circle on the front, the brand new Circles Framelits.
That 'dummy fairy' must be a Stampin' Up! customer I reckon :0)
Come back tomorrow when I will be taking part in the ILWS New Catalogue Blog Hop - if I can find the time to make something to show you that is!!!!
See you soon x

Sunday, 21 July 2013

Simples Sunday and LIM (again!)


Well it's Sunday again - where do the weeks go? I have combined my 'Simples Sunday' card with the LIM challenge which, this week, is Handmade Flowers. My entry yesterday really were 'handmade' flowers but I feel like I'm cheating a bit today because these flowers were so easy to make using punches.
I stamped an image from the Flower Shop set three times, using Crisp Cantaloupe, and punched out with the Pansy Punch and the centres are from the Boho Blossoms punch in Whisper White and Crisp Cantaloupe. I shaped the flower parts individually with the end of my pricking tool using a firm, circular motion, glued them together and a Basic Pearl was added to the centres.
An aperture was cut in a piece of white cardstock using one of the Apothecary Accents Framelits, with a piece of Crisp Cantaloupe cardstock placed behind before matting onto a card blank. All that was needed to finish the card was the sentiment from Sassy Salutations stamped in Baked Brown Sugar.

Sunday, 23 June 2013

Simples Sunday (and another sneak peek)


Two cards this week for Simples Sunday - one for a boy and one for a girl! And again showing you a combination of current, retiring and brand new products - as well as two brand new colours!
The retiring product is the sentiment from Friendly Phrases and, although it's retiring, it will be a set I hang on to as I just can't seem to part with the sentiment sets! The current products are the buttons from the Sweet Buttons Embosslits and the flowers from Boho Blossoms and Itty Bitty Shapes punches.
The rest will be revealed in just over a week's time. If you haven't got your catalogue yet, and you would like to buy one, please get in touch.
Enjoy the rest of your weekend x

Thursday, 16 May 2013

Labour of Love!


This is my 'labour of love' card that I was working on last week - called that because of the excessive amount of time it took to make!! It's an oversized card, an A3 piece of card folded to make a card which is A4, made for a work colleague who is leaving and it needed to be large so that everyone can sign it. I used Chocolate Chip for the mat with diagonal score lines across the top right and bottom left corners with Chocolate Chip butterflies stamped on the central plain section. I then used the large scallop oval die to cut Crumb Cake Cake cardstock and a smaller oval die for the Very Vanilla mat stamped with four butterflies, from the SAB set Bloomin' Marvelous, in Crunb Cake. I then punched four butterflies with the Bitty Butterfly punch in Vellum cardstock to overlay the stamped butterflies and added a Basic Pearl to each one. The flowers were made from Very Vanilla cardstock with the Boho Blossoms Punch and Blossom Party die. Leaves were punched from Certainly Celery with the Bird Builder punch. I finished the card with a computer generated sentiment cut into a banner and three Basic Pearls across the top right corner. I made a bag to put the card in which is pictured on the right.
Tomorrow I will be back to show you my card that was made for the same lady.


Friday, 3 May 2013

Another 60th


The last of my commissioned cards for this week - another 60th birthday with a requested colour scheme of black and red. I used Cherry Cobbler for the panel on the front of the card and used a stamp from Summer Silhouettes to make a faint background for the cascading Boho Blossoms punched flowers. The aperture in the Cherry Cobbler was punched with the 2 1/2" Circle Punch and the sentiment from Memorable Moments stamped in Basic Black directly onto the card base. I attached some Cherry Cobbler Tulle Ribbon, unfortunately now retired, around the left hand side of the card before fixing onto the card base with dimensionals. The addition of some black leaves punched with the Bird Builder punch, finished the card.

Sunday, 28 April 2013

Simples Sunday


Last week I had a bit of a production line going making thank you cards so it was one of those times when I really need a simple design. In all honesty you really can't get much more simple than this!
I started with an 8cm square card blank and stamped the flower border with a stamp from Bordering on Romance. I then added a couple of River Rock leaves punched from the Bird Builder punch, a flower from the Boho Blossoms punch and a sentiment from Teeny Tiny Sentiments which had been punched out with the Jewelry Tag punch. Really, really simple!! Apologies for the quality of the photo but I had to lay the cards down to get them all in and couldn't quite get the light right.

Sunday, 21 April 2013

Simples Sunday meets LIM


This week's challenge at Less Is More is 'CASE IT' and the ladies have made two cards for inspiration. It doesn't have to be a direct CASE, it can be the use of the colours, the layout, the subject matter, technique or the complete card. As I wanted to mix'n'match my entry with my 'Simples Sunday' posts I chose Jen's card, which was this one on the right.
My card was very simple, so simple that I made it whilst waiting for the supermarket to open so I could go and get my provisions for the week!!
As you can see I used the colours and layout of Jen's card for my CASE-ing with Pool Party and Crumb Cake as the colour scheme. I used the Natural Composition Speciality DSP for the matting which has a lovely embossed pattern and the Boho Blossoms punch to make the flowers. The sentiment is from Teeny Tiny Sentiments, punched with the Word Window punch and matted onto a Curly Label punch. To see my original 'Simples Sunday - For Kids' cards which were posted earlier today click here.
I had a lovely day in London yesterday and on the way to Afternoon Tea at Fortnum & Mason's (the birthday present from my daughter) I took a photo of a line of red telephone boxes and, when I got home, played around with it until I got this. No David Bailey but a memento of a lovely day!


Thursday, 4 April 2013

Monochrome again


Another black & white (and really simple!) card today. I used the border stamp from Summer Silhouettes to stamp across a card blank in Staz-on and then cut out the black panel with a die from Apothecary Accents. The little semi-circle at the bottom was snipped off to leave a straight edge before adhering to the card. A strip of Whisper White was cut to fit and a sentiment stamped, again in Staz-on, and then glued to the card. A flower, made with the Boho Blossoms and Itty Bitty Shapes Punch Pack, was fixed to the top semi-circle and three butterflies from Beautiful Wings Embosslits were added. The addition of a few small Basic Rhinestones finished the card.

Friday, 22 March 2013


Do you ever have times when you don't want to write a letter but you want something a little different to a card? Well I have set myself the task of designing a set of 'let's call them notelets' for my class in April and this is just one that I've come up with so far.
It is a C6 sized tag made with Soft Suede and Very Vanilla cardstock and decorated with Pool Party flowers made with the Blossom Party die and Boho Blossoms punch. The stems from Field Flowers are stamped in Certainly Celery and the sentiment from A Word for You in Soft Suede. A hole was made in the top and some Pool Party Ruffled ribbon threaded through and tied with Pool Party Baker's Twine. The small picture shows the back of the notelet, a square of Very Vanilla cardstock with plenty of room for you to write on.

Friday, 8 March 2013

Spring Box


This box is one I have designed for my next class and, whilst I normally don't post projects beforehand, occasionally there has to be an exception to the rule!!
The base is one of the Kraft Gift Boxes which come in a pack of 4 for just £2.75. Usually I like to make my boxes from scratch but on occasions it's nice to just be able to concentrate on the decorating and these boxes are a good size and very strong. They can, of course, be stamped but for this one I have used Daffodil Delight cardstock along with the Daffodil Delight DSP from the Polka Dot Parade pack to make mats to decorate the sides and top. The flower on the top was made by stamping 2 flowers from the Mixed Bunch set punched out with the Blossom Punch. Once this was done I broke up the fibres in the cardstock by working it quite firmly with a bone folder. By breaking the fibres it allows you to separate the cardstock into two layers, giving you four flower shapes rather than two. A small Pumpkin Pie Scallop circle was placed in the centre of the flower before securing together with an Antique Brad. A large Pumpkin Pie Scallop Circle was glued onto the top of the box and then three loops of Daffodil Delight Taffeta ribbon were attached with sticky strip before glueing the flower in place. The 'sweet treats' sentiment, from Teeny Tiny Wishes, and a retired 'for you' sentiment were punched with the Jewelry Tag punch and fixed onto a petal over the ribbon. The small flowers on the sides of the box were made with the Boho Blossoms punch.
I was really quite pleased with it when I'd finished (a rare occurrence!!!), and the nice, bright Daffodil Delight goes so well with the Kraft. I have a feeling I will be making a few more of these in different colours!

Thursday, 24 January 2013

Friends again


Faced with the snow, and my own company, for 2 days last weekend and then an unexpected extra day off work on Monday saw me doing an unusual amount of crafting. I have had the stamp set I used for this card since last October and this is the first time it's been out of the box - how bad is that? Anyway, it's called Language of Friendship which is particularly appropriate for this week's  
Less is More challenge of 'Friends'.
I think this is a set that is easily overlooked in this year's rather large catalogue however it is a lovely set which also co-ordinates with the Bird Builder and Boho Blossoms punches. I didn't use the punches for this card and settled for stamping directly onto Very Vanilla cardstock. As the bird, his wing and the branch are all on one stamp this meant I had to colour the individual elements with markers and use my Stamp-a-ma-Jig to position onto the card. I am no bird expert so this is just a 'made up' one using a blender pen, Early Espresso and Old Olive for the colouring. The sentiment is also from the set, which has the name of the author underneath the phrase but, as I wanted it to fit onto a Modern Label, I just coloured the bit I wanted with a marker. This was matted onto a Decorative Label which had been trimmed down (the curly bit at the top & bottom cut off!) and everything assembled on a 10cm square card blank made with Early Espresso.
Until next time keep warm and hopefully this weekend will see the last of the snow x

Sunday, 2 September 2012

Brown & Pink

It's a colour challenge of Brown & Pink this week at Less is More and this is the card I've made. I punched one edge of a piece of Whisper White cardstock with the Eyelet Border punch before matting onto a slightly larger piece of Chocolate Chip. Before fixing to my card blank I tied some Pink Pirouette Taffeta Ribbon round and finished with a bow. The central stamp is from Everything Eleanor stamped in Crumb Cake with a sentiment from Petite Pairs stamped in Chocolate Chip. I made some flowers with Pink Pirouette and Chocolate Chip cardstock, punched with Boho Blossoms and Itty Bitty punches, with a basic Pearl for the centres and the leaves are from the Bird Builder punch.
I'm really not a fan of pink but, if I have to use it, then putting it with brown is ok with me :0)

Thursday, 30 August 2012

Treat Basket


This is a little gift basket I made as a peace offering for my 2-year old Grandaughter. Last night my Grandson (aged 4) wanted to come for a 'sleepover' (his word not mine!) with Granny and his sister wasn't very happy that she couldn't come as well. So I had this to give her when I went to pick him up, it goes without saying that she liked the contents (some sweets and grapes) better than the basket but she was swinging it round for a time before her Mummy took it off her and said it could go in her bedroom to keep her hair slides in.
These are the simplest baskets to make, a square of card which can be any measurement that is divisible by 3, score to make 9 equal squares, cut along the two score lines on two opposite sides, then draw up the two sides to meet in a point (glue together where the card touches). Hope that makes sense but honestly it is really easy. The flower on the front was made with the Blossom, 5-Petal Flower and Boho Blossoms punches and fixed in the centre with a Rhinestone Brad. The handle was made with the Dotted Scallop Ribbon Border Punch again fixed with Rhinestone Brads. I added some loops of Pink Pirouette Taffeta Ribbon and a couple of butterflies cut from the Beautiful Wings Embosslits die.
* Update on the blog 'clear out' - there are now a lot of old posts which no longer have the photos but I need to set aside some time to delete them completely. Please bear with me - it's not a quick job!

Wednesday, 22 August 2012

Two of Six


As you read this pretend it is tomorrow (Thursday) because I meant to schedule the post for then but hit the wrong button and can't seem to alter it now!!!
Yesterday I showed you a card which was part of a set so, today, I thought I'd show you the second card - again with a colour scheme of Crumb Cake and Basic Black. I started by cutting a piece of Crumb Cake DSP and cardstock to fit onto an A6 card blank and then cut the bottom edge of the DSP with a die from Adorning Accents Edgelits and embossed the bottom edge of the cardstock with the matching Adorning Accents Embossing folder both from the Summer Mini (which incidentally finishes in just over a week on 31st August). An image from Bordering on Romance, also from the Summer Mini, was stamped in Basic Black onto the DSP along with a sentiment from Sincere Salutations and small flowers made with the Boho Blossoms punch and one of the Itty Bitty punches were placed on the stems. Tiny Basic Pearls were added to the centres of the flowers to finish the card off. I will try to be back tomorrow with card number 3.

Wednesday, 15 August 2012

Swing Card & Treat Box


I have a little gift set to show you today, made with a mish-mash of products and stamp sets (but serves to show just how good SU products are to mix'n'match!) The swing card is made using the Framelits dies and is not as complicated as it may look, there are a variety of instructional videos on YouTube if you want to have a go yourself. The little Treat Box can be made in various sizes by simply using different size dies.
I won't bore you by going into great detail but the supplies I used are as follows; Old Olive cardstock and Taffeta Ribbon, Twitterpated DSP, Framelits dies, Bird Punch (leaves), Boho Blossoms punch, Itty Bitty Shapes Punch Pack, Basic Rhinestones.
I have been overwhelmed by the number of good wishes I have received in the past weeks whilst my Dad has been in hospital, lots from people I don't know but who I feel like I know. Crafters are such a lovely bunch of people aren't they? He is still there and, like I've said before, it's going to be a long haul but we'll get sorted in the end I'm sure. Thanks again everyone x

Monday, 13 August 2012


This will be short & sweet but I finally got round to making a long overdue card to send to a lovely lady who I met through Stampin'Up! still at least I have another card to show you!
I stamped the flower from Reason to Smile which had been inked with Calypso Coral and Lucky Limeade and coloured with a blender pen then cut out with a Framelits die. This was matted onto the next size frame which had been inked around the edge, a loop of Calypso Coral Ruffled Ribbon attached to the back and fixed onto a card blank with dimensionals. The tiny flower was made with the Boho Blossoms and Itty Bitty punches and the tags are stamps from Tiny Tags, punched with the Jewelry Tag Punch and a tiny piece of Bakers Twine threaded through a hole in the top


Sunday, 17 June 2012

Speedy Box!

Today I needed a very quick token gift to say thank you and this holder was made in around 10 mins using the Two Tags die. I cut two of the tags in Wisteria Wonder and partially embossed them (down to the score line) with the Perfect Polka Dots Embossing Folder, the plain parts were then glued together to form the base. I made a little box to go inside to hold two wrapped chocolate truffles and glued just the base to the holder to keep it in place. The tags were made with stamps from Tiny Tags and cut with the Jewelry Tag punch and the flower made with the Boho Blossoms punch. The little favour box was then held together with a piece of Wisteria Wonder Ruffled Ribbon. A very quick, inexpensive gift but perfect when you just want to say thank you.

Saturday, 16 June 2012

Simply Stampin' Sketch


Oh dear, my posts this weekend are a bit like buses - nothing for ages then two come along at once! I have had a bit of extra crafting time this weekend due to the fact that I had to wait for someone to come and have a look at my conservatory roof which, in all this wind, has decided to come adrift. He has now been and inspected it and has to 'send the boys in' another day - just what I needed :0)
Anyway onto the cards which I made for the Simply Stampin' challenge. The first one is made with Perfect Plum as the card base with a strip of Elegant Eggplant, cut with the Dotted Scallop Ribbon Border punch, placed across the card. The central panel is a Whisper White Top Note embossed with the Elegant Bouquet Embossing Folder, inked around the edge and glued in place onto the card base. I added two flowers to the top left corner made with the 5-Petal Flower punch and two smaller flowers in the bottom right corner punched with the Boho Blossoms punch. The sentiment is from the retired Create-a-Cupcake set.
The second card was a bit of an experiment and I'm not overly pleased with it (think the added circles were a step too far!) but thought I'd show you anyway. I made a base card with Naturals Ivory cardstock and layered on a piece of DSP from the First Edition Speciality pack which I had overstamped with images from French Foliage in Basic Black. The strip across the middle is the negative part of a piece of cardstock which had been cut with one of the Adorning Accents Edgelits dies, I used the negative part because I thought it looked more manly than the piece you are supposed to use! Three tags, stamped with Tiny Tags and cut with the Jewelry Tag punch, were added to the central strip and I think this is where I should have stopped. However, because the sketch required circles I stamped two of the French Foliage leaves and punched them out with a circle punch and overlapped these onto two slightly larger circles punched from Basic Black cardstock.

Sunday, 27 May 2012

Gift Bag


A while ago I showed you a card I made for a work colleagues 60th birthday and I have made this little matching gift bag to hold a small box of continental chocolates.
The bag is made with Whisper White cardstock as are the flowers, with a touch of Rose Red to add a little bit of colour (and to match the card!). The large flowers are made with the Blossom Party die, the smaller ones are punched from the Boho Blossoms punch and the leaves are cut with the Little Leaves die. I added a sentiment from Oval All, punched with the Oval Punch and matted onto a Rose Red Scallop Oval. The handles are made with Rose Red Seam Binding.
I hope you are making the most of this hot sunshine although, I have to say, I would have liked a bit of Spring in between Winter and Summer. Last week I was still wearing a winter coat and this week I'm too hot in a t-shirt!!
Related Posts Plugin for WordPress, Blogger...