Pages

Showing posts with label Adorning Accents Embossing Folders. Show all posts

Wednesday, 8 May 2013

Field Flowers


This is a card I made for no particular reason although I'm sure it will come in handy at some point!
I used a piece of Elegant Eggplant cardstock and cut an aperture with a die from the Ovals Collection Framelits. I then stamped images from Field Flowers, to go behind the aperture, using Elegant Eggplant, Wisteria Wonder and Old Olive onto Whisper White. Before attaching to the card blank I embossed two fancy lines along the bottom of the Elegant Eggplant panel using one of the Adorning Accents Embossing Folders and rounded the corners of both this and the card blank. The sentiment is one from A Word for You which was fussy cut before fixing to the card.
Tomorrow I will show you a second card I made with the leftover oval which was cut out and the same stamp set.


Sunday, 13 January 2013

With Love


Hello on this very cold and frosty morning (no I'm not going to start singing about mulberry bushes!) and as we are fast approaching February I thought I would show you a little 'not too slushy' Valentine's card. I started with a 10cm square card blank along with a piece of Real Red and Whisper White cardstock. Before adhering the Whisper White to the Real Red it was embossed towards the bottom with the hearts folder from the Adorning Accents Edgelits set. A large heart was diecut using the Scalloped Heart of Hearts Embosslits folder and glued in place before adding a Real Red heart, punched with one of the punches in the Itty Bitty Shapes set, and a Basic Rhinestone added to the centre. I don't have any current Valentine's sentiments but I thought this one from Perfect Pairs made the card say a lot without saying too much - if you get my drift!! Now onto the ribbon. At Christmas I was given a shop bought card from a friend and it had a ribbon fixed to it just like this and I loved it. Sometimes on a card (particularly one like this) it needs a little something extra but there's not really room to add a ribbon, well this solves the problem. Punch a little hole towards the top of the card, take a piece of ribbon and fold in half, poke the loop through the hole (from the back to the front) bring over the 2 tails and thread through the loop. It does take a bit of careful pulling to get it right but gives a lovely result I think. The panel was then positioned onto the card blank and job done :0) Thankfully, after what didn't turn out to be a very good year for our family, things seem a lot more settled and I am gradually getting back into the swing of crafting a bit more - to the detriment of the housework I have to say!! So hopefully in time I will get back to blogging on a more regular basis. A big thank you to all who have left such lovely comments and I am sorry I have not had time to return the favour but, one step at a tme as they say. Bye for now x

Monday, 1 October 2012

ILWS Blog Hop


Welcome to the ILWS Blog Hop showcasing products from the brand new Autumn/Winter catalogue and the 2012-13 Ideas Book & Catalogue. Scroll down to see what I've been making.


You will have come to me from Laura, at http://lauracreativeideas.blogspot.com/ who's idea it was and who is the first stop on the blog hop.Thanks for organising us all Laura :0)
I won't go into too much detail as you will want to move on to see all the other projects from the lovely demo's taking part.  The first set of things are made with the Ghoulish Googlies Bundle & Howlstooth DSP


The B&W striped Milk Carton above holds a battery nite lite and the picture in the centre shows what it looks like lit up when it's dark! Credit for the ideas of the Notebooks (top right) goes to Vicky Hayes (aka Crafting Clare) and Ange Juda (aka Chic'n'Scratch) for the Two-Fold Treat holder (bottom right). Next thing to show you are projects made with the Autumn Accents Bigz Die


Left & Right are cards made with the die cut leaves/acorns which have been sponged, scored and curled to give dimension and in the centre is a wreath made from die cut leaves and acorns which have been made in the same way. On the wreath I added some Crystal Effects to the acorns to make them a little more 3D. My final projects are showing you the fabulous new 2012-14 In Colours - Raspberry Ripple, Gumball Green, Midnight Muse, Primrose Petals & Summer Starfruit. I used the Mixed Bunch stamp set & matching Blossom Punch along with the Adorning Accents Edgelits Dies and Embossing Folders which were all in the Summer Mini but have thankfully been carried over to the main catalogue.

Right I hope you're not too bored now after this long post and you will carry on happily 'hopping'. Your next stop is Angela over at http://www.sparklycards.blogspot.co.uk/

 Thanks for stopping by and enjoy the rest of your journey :0)
Just in case any of the links aren't working, below is a list of all the demos taking part
 1 - CreativeIdeas_Laura http://laura-creativeideas.blogspot.com
2 - Margaretk21 - http://makingpapercrafts.blogspot.com
3 - Angela www.sparklycards.blogspot.co.uk
4 - Leanie - www.beautifulimpressions.co.uk
5 - Alison - www.craftingalison.blogspot.com
6 - Beckie - www.bextiesandstickytape.blogspot.com
7 - Gill - http://lilybygilly.wordpress.com
8 - Diane - http://craftwithstyle.blogspot.com
9 - Dawn - www.tartanstamper.blogspot.com
10- Zoƫ http://www.stampingscene.blogspot.com
11- Fiona W - http://oakfieldcrafts.blogspot.com
12- Elaina - http://moulinrougestamps.blogspot.co.uk
13- Anne-Marie - http://classycrafters.blogspot.co.uk
14- Sarah - http://esellek.blogspot.co.uk
15- Vronnie - http://vronstampin.blogspot.co.uk
16- Christa - http://serendipity-stamping.blogspot.co.uk
17- RuthE - http://pearsonifiedcrafting.blogspot.co.uk
18- CarolynUK - http://stampaholix.blogspot.co.uk/
19- Amanda - http://thecraftspa.blogspot.com
20- Patricia - http://stampinbeckscraft.blogspot.com
21- Tara - http://ihaventgotacleverblogname.blogspot.co.uk
22- Emma (Citaborca) - http://cocktailofcard.blogspot.co.uk/
23- Emma H - http://www.emma-letsstamp.blogspot.co.uk
24- Sarah Scribbles - http://card-delights.blogspot.com
25- Sarnie - http://www.kraftybiker.blogspot.com/
26- Sharon - http://all-inked-up-sharon.blogspot.co.uk
27- Lynn - http://www.heavenlycrafts.com/stampinheaven/
28- Emma - http://www.emma-daye.blogspot.com
29- Erika - http://twintroublescreations.blogspot.co.uk/
30- Elaine - http://thesassystampers.blogspot.co.uk/
31- Nicky - http://nickyjohncock.blogspot.com
33- Kara - http://karascraftycorner.blogspot.com/
34- Ally - http://www.serendipitypapercuts.blogspot.com
35- Clare (Sparkle) - http://www.sparklecrafts.blogspot.com
36- Julie H (craftybug) - http://www.the-crafty-bug.blogspot.com
37- Jane (browniow) - http://www.janeiowcraftycreations.blogspot.com/


Monday, 27 August 2012

Pink and Sparkly


 Back today with something a little prettier than my recent posts. It is my Grandaughter's 4th birthday next week (4 going on 14!!!) and she likes all things pink & sparkly - unlike Granny who hates pink and is not so keen on sparkly either! Anyway this is the card I have made for her using Pink Pirouette, Whisper White and the Pennant Parade stamp set along with the Petite Pennants Punch. The number and letters were cut with the Timeless Type Junior Alphabet die and I embossed the edge of the Whisper White card with one of the Adorning Accents Embossing Folders. The sentiment and balloons are from retired sets and for the sparkle I added quite a few Basic Rhinestones.

Wednesday, 22 August 2012

Two of Six


As you read this pretend it is tomorrow (Thursday) because I meant to schedule the post for then but hit the wrong button and can't seem to alter it now!!!
Yesterday I showed you a card which was part of a set so, today, I thought I'd show you the second card - again with a colour scheme of Crumb Cake and Basic Black. I started by cutting a piece of Crumb Cake DSP and cardstock to fit onto an A6 card blank and then cut the bottom edge of the DSP with a die from Adorning Accents Edgelits and embossed the bottom edge of the cardstock with the matching Adorning Accents Embossing folder both from the Summer Mini (which incidentally finishes in just over a week on 31st August). An image from Bordering on Romance, also from the Summer Mini, was stamped in Basic Black onto the DSP along with a sentiment from Sincere Salutations and small flowers made with the Boho Blossoms punch and one of the Itty Bitty punches were placed on the stems. Tiny Basic Pearls were added to the centres of the flowers to finish the card off. I will try to be back tomorrow with card number 3.

Sunday, 12 August 2012

One Layer - Feathers


Well another busy week with not much time to craft, so when I saw the LIM challenge this week was a one layer card using Fur or Feathers, I thought I'd grab a few minutes to make one - I'm not so sure I should have bothered because I'm not very happy with the result but thought I'd show you anyway!

I used a stamp from a Hostess set which was available in the Spring Mini and using my markers I coloured the stamp with three colours, I then used the smallest die from the Framelits set to emboss a frame (turn the die so the cutting side is up) around the image. Although I love very simple cards I felt this was a bit too sparse so I cut down one side with an Adorning Accents Edgelits die and embossed the opposite side with an Adorning Accents Embossing Folder. After inking around all the edges on the front of the card I masked a strip on the inside of the card and inked this as well - the small picture above shows the card when shut. Not a brilliant effort but I tried :0)

Sunday, 29 July 2012


Just a very quick post as it's been over a week since my last one. My Dad is still in hospital so not much time for crafting and, what little time I have had, I've been frantically making 60 Mini Milk Carton Favors for a wedding next Saturday! Anyway today's card is one which I made a couple of weeks ago for a retirement using flowers made with the Blossom Party die which was available in the Spring Mini (let's hope it reappears in the main catalogue in October). The small flowers are punched with an Itty Bitty Punch and the leaves are made with the Little Leaves Sizzlits die. I used Rich Razzleberry for the main colour with a mat of Whisper White on top, the side of this was cut with one of the Adorning Accents Edgelits die and embossed with an Adorning Accents Textured Impressions Embossing Folder, both available in the Summer Mini until the end of August. The card was finished off with a sentiment and a few Basic Pearls.
Thank you for still visiting and I will try to post again as soon as possible :0)

Tuesday, 10 July 2012

Pearl Anniversary


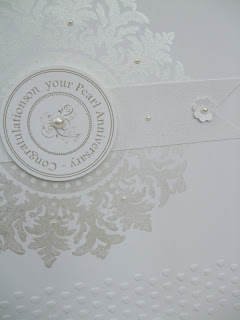
Now it is safely in the hands of the recipients I can show you a Pearl Wedding Anniversary card I was asked to make a few weeks ago. I started by daubing the large Medallion stamp with Champagne Shimmer Paint and stamped onto Whisper White cardstock, this was put aside until the Shimmer Paint was completely dry. Once dry I embossed the bottom part of the card using the hearts folder which is one of the Textured Impressions Adorning Accents Embossing Folders set available in the Summer Mini. The stamped and embossed panel was layered onto a piece of non-SU pearlised cardstock which I found in my stash and then matted onto an A5 card blank. A simple banner to go across the card was made with Whisper White with a tiny punched flower and some Basic Pearls added. The sentiment is computer printed and one which I found on Annette's blog (click here to go to her post) so a big thank you to Annette as it was perfect for my card. The picture bottom right shows the box I made to put the card in.
Once again I would like to thank everyone for their kind thoughts and wishes for myself and my Dad, it really does mean a lot to me x

Thursday, 5 July 2012

Thank you


The card today is very apt as I wanted to begin by saying a big thank you to all those people who have still kept visiting, and leaving good wishes, despite my distinct lack of blogging! Unfortunately this will continue for a while yet as my Dad is still very poorly in hospital and, as the time goes on, life gets even more hectic.
Anyway onto the card - being the end of the school year I have been asked by several colleagues for thank you cards so I have been frantically trying to put a few together and this is one of them.
The stamp is from the Simply Soft Hostess set, stamped in Certainly Celery and, as this is a 2-step set, the flower part stamped in Rich Razzleberry using a stamp-a-ma-jig. The bottom section of the card was cut at an angle using one of the Edgelits dies in the Summer Mini and then embossed with an Adorning Accents Embossing folder before layering onto Rich Razzleberry cardstock. This was matted onto a card blank and a sentiment added which was punched with the Word Window punch and layered onto a Modern Label.
I have more thank you cards to share with you so, as soon as I find a bit of spare time to show you, I'll be back.
Related Posts Plugin for WordPress, Blogger...