Pages

Showing posts with label Square Lattice Embossing Folder. Show all posts

Sunday, 27 October 2013

Simples Sunday


This week's Simples Sunday card - and another entry for the Less is More challenge 'String or Twine'.
A similar design to yesterday's card and just as smple but, this time, an anniversary card. The cardstock is Naturals Ivory which has a lovely rustic feel and goes perfectly with the Linen Thread. Both hearts were punched with the large Heart Punch and the one at the front was embossed using the Square Lattice Embossing Folder to add texture. A sentiment from the Hostess set 'Express Youself ' was stamped using the Gold Metallic Encore pad and a bow of Linen Thread was added to the embossed heart. I told you it was easy :0)
Have a good day and I'll be back soon
Margaret x


Tuesday, 23 July 2013

Notes case


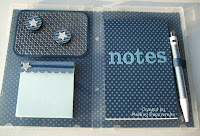
This is a small gift I have made for a very good friend who is leaving school to complete his teacher training (fingers crossed he will be back next year!). His name isn't really Giz, that's just what everyone calls him! 
I bought these cases last year and they have been sitting in my craft room ever since so I thought I would have a go at making a 'notes box'. I have to say it has taken me ages to make as I just didn't know how to decorate it but, as I had to have it ready by today, I decided to get a move on with it on Sunday. 
I have used Midnight Muse DSP and cardstock to decorate the case and cover the notepads and the 'brainstorming' cover was made by using computer generated words punched with the Cupcake Builder Punch. I put a little magnetic board inside (bottom right) by running a piece of a drinks can through the Square Lattice Embossing Folder which was then glued to a larger piece of cardstock. The magnets were made by cutting some thick chipboard with the Circles Die, covered with DSP and a magnet glued on the back. A few Glimmer Paper stars were added to finish. I can't honestly say I'm thrilled with the result but, as they say, it's the thought that counts and I'm sure he'll appreciate it anyway - well I hope so :0)


Wednesday, 12 June 2013

Embossed Dots


A really simple card and a great way of using up some of those card scraps.
For this card I used Lucky Limeade, Early Espresso and Crumb Cake and punched different size circles. These were glued to a panel of Whisper White cardstock before running through the Square Lattice Embossing folder. This was matted onto Lucky Limeade and then onto a card blank with a narrow strip of Early Espresso running across the card. The sentiment was cut with a die from the Apothecary Accents Framelits collection and then cut again to make a smaller frame before matting onto another one cut with Early Espresso.
Tomorrow I hope to show you a matching set which I have made for a friend's birthday.

Saturday, 27 April 2013

LIM No.3!!!!


Oh dear another entry for the LIM challenge which is the third today!! This watch has been sitting around on my desk for a couple of weeks waiting to be made into a card so I have finally completed it to fit today's Sketch challenge.
I have seen a few people make the new SU Soda Pop Tops into watches using the Dapper Dad stamp set for the watch face but, as I don't own this set, I had to improvise. I used the clock stamp from Forever Young stamped in Versamark and silver embossed before punching the clock face with a Circle Punch. This was matted onto a larger punched circle of Brushed Silver cardstock before covering with Crystal Effects. The Soda Pop Top was flattened in the Big Shot and, when the clock face was dry it was adhered to the Pop Top, again using Crystal Effects. The watchstrap was made with Brushed Silver cardstock embossed with the Square Lattice Embossing Folder. The watch was positioned onto a panel of Twitterpated DSP matted onto Basic Gray cardstock and then onto a DL card blank and the sentiment is computer generated. A Basic Rhinestone was added to the centre of the watch face and a couple on the sentiment banner to add a bit of bling!
No more entries for this challenge I promise :0)

Friday, 12 April 2013

Not So Inspiring!


When this catalogue (above left) dropped through my door the other day I looked at the cover picture and thought 'now there's an inspirational challenge' (more of a challenge than inspirational I assure you!). So, as I have set myself a personal challenge to use more colour combinations, I set to and made this card. I will say, before I go any further, that I really don't like the finished card but at least I rose to the challenge and got out of my comfort zone (well and truly!)
The colours I used were Island Indigo (which is much brighter than it appears in the photo) Chocolate Chip, Calypso Coral, So Saffron and Whisper White. The wavy strips were cut with the Tasteful Trim Bigz XL die and, once everything was glued into place I ran the panel through the Square Lattice Embossing Folder before matting on to a card blank with dimensionals. The sentiment is from Teeny Tiny Wishes punched with the Small Oval punch. I'm sure you'll be pleased to hear that I don't think I will be making too many cards like this one!!
Now let me show you something REALLY nice! At my class yesterday both my sister and Jen turned up with homemade goodies for 'coffee time'. Both of them forgot to take the spares home so it looks like I'm just going to have to eat them myself - oh what a shame :0)


                  Carrot Cake Cupcakes


                                           and


                                       Danish Pastries (the one bottom centre got eaten before I took 
      the photos, but there's a crumb left!!)


Thursday, 23 August 2012

Three of Six


As I messed up my scheduling yesterday and posted two cards I thought today I would show you a third card for the set I am making. This is such a simple card to make, and an idea which I have used a few times before, but I love the effect the embossing gives - it makes it look like the punched circles are actually printed onto the cardstock. You simply take your piece of base card and arrange punched circles (which also uses up all those scraps) in any way you want to, glue them to the card, trim off any that are overlapping the edge and then run the whole thing through your die cutting machine using the Square Lattice Embossing Folder. For this particular card I matted the embossed panel onto some Crumb Cake DSP and layered onto a plain white card blank. I stamped the sentiment from a retired set and punched with a circle punch then matted onto larger circles of Basic Black and Crumb Cake, this was then laid onto a piece of Basic Black Grosgrain Ribbon and a loop made one side and the other side cut at an angle. I finished it off with a tiny black heart punched with the Owl Punch.
I have always used circles when making this design but you could use any punched or die cut shapes you fancy - one with different sized hearts would be very effective for an engagement, anniversary or wedding card. Back tomorrow to show you number 4 :0)

Friday, 6 July 2012


I found a bit more time to blog last night so, as I had already posted yesterday, I scheduled this card for today.
A very simple card to make if just a little time consuming. Several different size circles were punched from Night of Navy and Lucky Limeade cardstock then arranged and glued onto a piece of Whisper White. The sentiment from Curly Cute was stamped at the bottom right of the card before running the whole thing through the BigShot in the Square Lattice Embossing Folder. This was then layered onto Lucky Limeade cardstock, some Bakers Twine wrapped around and knotted then matted onto a card blank.

Monday, 4 June 2012

Ruby Anniversary


Yesterday I was invited out for Sunday lunch some friends to help celebrate their Ruby Wedding Anniversary and they requested that, anyone wishing to, could make a small cash donation to a charity which is very close to their hearts rather than buy gifts. Whilst I was more than happy to do this I couldn't let the day go by without a small gift so I bought them a bottle of bubbly (only telling you this so you know what the tag is for!)

The card is one that I completely CASe'd from Ruth, a DT member at Simply Stampin', and her card is here. I had already been asked to make a couple of cards for the same occassion so I was running out of ideas for a card from me when I came upon Ruth's gorgeous card - so thanks Ruth you helped me out no end :0)
The colour combo is Cherry Cobbler and Crumb Cake and uses an SAB set from last year called Sweet Summer. The hearts are punched with the Small Heart punch and decorated with Basic Rhinestones and the numbers are cut with the Timeless Type Junior Alphabet dies and run through the BigShot in the Square Lattice Embossing folder. The card was finished off with a knot of Linen Thread across the top corner. The tag to go on the bottle was cut with the Two Tags die and the flower was made with Crumb Cake cardstock and the Scallop Circle punch with an Antique Brad in the centre. I made a matching envelope with the Scallop Envelope die to hold the donation to charity.

Sunday, 13 May 2012

Challenging Colours!

The Simply Stampin' challenge this week is certainly what you would call a challenge - the DT want us to come up with something made with Regal Rose, Real Red, Island Indigo and Whisper White. At the end of the post they said that they hoped the colour challenge wouldn't have us 'running for the hills' - well the only reason I didn't is because the hills are too far away!!!!
Definitely not a colour combo I would choose but it gave me a chance to try something I've seen done many times before but never actually got round to doing. I practised with circles but you could use any shape you like for this technique and, having seen the finished effect, it's definitely something I'll be doing again (just maybe not these colours!) 
I started by punching different size circles from the coloured cardstock and then arranged them onto a piece of Whisper White card, when I was happy with how they looked I glued them using a wet glue to make sure they were properly stuck all over. I then simply ran the whole thing through the BigShot in the Square Lattice Embossing folder. This was then matted onto a piece of Island Indigo cardsock and then onto a card blank. The sentiment, from the Hostess set, Happiest Birthday Wishes. was stamped in Island Indigo, cut into a banner and inked around the edges with a sponge dauber.

Here is a close up of the finished effect. This particular embossing folder gives a lovely texture to the cardstock and it actually looks like the colours are painted on rather than glued on pieces of card!                                   
*If you saw my previous post  you will know that a lady called Jo Street (her post is here) has made an appeal for donations of cards to sell, to raise money for the Candlelighters Appeal, at a Ladies Night on the 31st May. Sadly it is too late for 3 year old Florence for anything other than to receive the vital care & support from Candlelighters that she and her family need at this desperate time. As a Granny to four toddlers it breaks my heart to think what this family must be going through so I urge you, even if you only send one card, please get in touch with Jo. Her contact details are on her post that I've linked to above. PLEASE let's help Jo raise lots of money.
Whilst having a look at the Candlelighters website I came across this video which Scalby School Girls recorded last year in aid of the charity - take a look

Thursday, 12 April 2012

Welcome Baby!


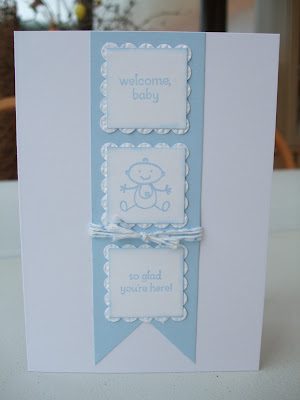
Yes I finally got away from the Punch Art cards (although I have still been case-ing them!) and have a baby card for you today. I used the baby image from All in the Family and the sentiment from Petite Pairs, all stamped in Basful Blue and punched with the small Square Punch. These were matted onto Whisper White which had been run through the Square Lattice Embossing folder and punched with the Scallop Square punch. A strip of Bashful Blue cardstock was cut to fit and the bottom was shaped with the Square Punch then the Scallop Squares were positioned onto this, leaving room to tie round some Bakers Twine on which I had added stripes with a Bashful Blue marker.

Saturday, 24 March 2012

It's challenge day again!


Well it's Saturday morning and it's challenge day again - don't the weeks just fly by? I have 2 cards to show you this morning, both of which fit the Less is More challenge - Take 3 Challenges, and the second which was made for the sketch challenge over at Simply Stampin'. I'll start with this one though because I know that Chrissie & Mandi won't be too happy with the lack of white space on the second card :0)
As I wanted to make a get well card I used the owl punch to make a nurse and decided to use the Bashful Blue striped DSP and Pacific Point cardstock for her dress and 'cape' as this is the colour I always think of when picturing nurses! The wings were actually punched from the 2-step Bird Punch and the red cross from one of the punches in the Itty Bitty Punch Shapes pack. Her hat, which doesn't show up too well in the picture is the same shape that was used for the dress but turned upside down. I cut 2 circles with the Circles Die to mount the owl on and embossed the white one with the Square Lattice Embsossing folder, glued this to the card blank and added a sentiment from Curvy Verses in Pacific Point.
The challenges I used were Wk 9 - A Touch of Red, Wk 12 - Off Centre, Wk 22 - Shades of Blue and Wk 29 - Things that Move.
Now onto my second card (made predominantly for the Simply Stampin' Sketch)


For this card I used a piece of Whisper White card on which I had used the Mother of  Pearl technique with Perfect Plum ink (left over from a card I made last week!) The bottom edge of the cardstock was punched with the Scallop Edge Border punch, matted onto a piece of Perfect Plum cardstock and a bow of Perfect Plum Taffeta ribbon tied around before layering onto a white card blank. The branch from Hopeful Thoughts was stamped in Elegant Eggplant and some flowers were punched from a scrap piece of the Mother of Pearl cardstock, with an Itty Bitty Shapes punch, and positioned onto the branch with one of the tiniest Basic Pearls for the centres. The stamp is also from Hopeful Thoughts but, as I didn't want all of the sentiment, I used a Perfect Plum marker to ink the bit I wanted, stamped onto Whisper White and then punched out with the Modern Label punch. The label was inked around the edges with a sponge dauber before positioning onto the card.
The challenges I used for this card were Wk 49 - Predominantly Purple, Wk 55 Punches or Diecuts and Wk 56 - Don't Scrap It (the Mother of Pearl cardstock!).
A rather long post today so I'll just say have a great weekend and enjoy the sunshine x

Wednesday, 21 March 2012

The card I am showing you today is one which I had to make for a very sad occasion and this post is my small tribute to a lovely person. Last week a very good neighbour, and friend, passed away suddenly and will be greatly missed by his family and friends. Derek was such a lovely man, always there to lend a hand and someone with a very good sense of humour, something which he certainly needed when his wife and I got together as we constantly ribbed him.
My thoughts are with Dorothy, Andrew, Elaine and his grandchildren at this very sad time.

Supplies used for this card are Whisper White & Basic Black cardstock, Square Lattice Embossing Folder, Hopeful Thoughts, Basic Black Satin ribbon

Monday, 12 March 2012


The two cards I have for you today are using the stamp set Everybunny and are ones that I have made for my grandchildren. Sky is 3 and definitely a 'pink' girl and Conor is only 6 months so I can still get away with using baby blue!
I stamped the bunnies in Crumb Cake then coloured the images using various colours and a blender pen, and then they were punched out with the Extra Large Oval punch. The DSP from the Paper Stacks were embossed using the oval folder from Designer Frames and then glued to a piece of matching cardstock with the oval bunny image placed inside the embossed frame. Some taffeta ribbon was tied around the panel and then the whole thing glued onto a DL card blank. As I didn't want the whole sentiment, I inked the part I wanted with a marker and stamped this above the names which had been cut from the Timeless Type Junior Alphabet dies and run through the Square Lattice (pink) and the Perfect Polka Dots (blue) Embossing folders before being positioned onto the card. On Sky's I added a little pink butterfly which was from the Beautiful Wings Embosslits die.

Saturday, 10 March 2012

Spring Flowers


I got the idea for these flowers from a site called Valita's Designs & Fresh Folds, where the very talented lady has done a video tutorial which can be found here. They are made with the 5-Petal Flower punch and the branch from the Bird Buillder punch.
I just had to have a go at making some of these and this is how they looked when I'd finished. I used Whisper White to make the flowers and coloured them with Melon Mambo using a sponge dauber, and the stems are made with Certainly Celery cardstock.
I made three flowers for my card and mounted them onto a panel of Melon Mambo which had been embossed with the Square Lattice Embossing folder. A knot of Pretty in Pink Taffeta ribbon and a sentiment finished off the card.
I am entering this card for the St.Luke's Charity Card Challenge where this month's theme is Spring into Spring.

Tuesday, 6 March 2012

Springtime Smiles

Another card using the gorgeous stamp from Easter Blossoms but this time in pink.
As for yesterday's card I stamped the image in Early Espresso and then, without re-inking, stamped again. The blossoms were coloured with a blender pen using Melon Mambo and Pretty in Pink and the panel was inked around the edges with Pink Pirouette. I then took a piece of Pink Pirouette cardstock, slightly smaller than the card blank, and randomly stamped the blossom branch all over using Pink Pirouette before embossing one end with the Square Lattice Embossing Folder. The blossom panel was glued into place, a piece of Pretty in Pink Taffeta ribbon was tied around and then the whole thing glued onto the card blank. The sentiment, also from Easter Blossoms, was stamped in Pretty in Pink, punched with the Oval Punch and then matted onto a Pink Pirouette Scallop Oval.
This could be used as an Easter card or equally well a card sent to someone who may need cheering up a little. This stamp's for life not just for Easter (sorry about that, just trying to bring a little humour into what is a very boring post!) Tomorrow I will show you another Easter card made with a different stamp from the same set.

Thursday, 1 March 2012

Quick'n'Easy again


I have a really simple card to show you today using a scrap of DSP, from the SAB freebie pack, Everyday Enchantment. A strip of the DSP was glued to a slightly wider strip of Riding Hood Red cardstock and then run through the BigShot in the Square Lattice Embossing Folder before fixing to a white card blank. The sentiment was stamped onto Whisper White, punched out with the Word Window punch and then matted onto a punched Modern Label. A tiny flower was punched with an Itty Bitty Shapes punch with a Basic Pearl placed in the centre. Very quick and very easy!
Related Posts Plugin for WordPress, Blogger...